objective: students will make a slide show in imovie showcasing 20-40 of their best photographs over the course of the semester.
instructions:
Make a photo slide show of all of your best photos from this semester! It's a great way to share your work and what you've learned with your family and friends. Choose 20-40 photos to include. Follow the instructions below.
step 1: create album
- Make an album in iPhoto with all of the photos that you want to include in the slide show.
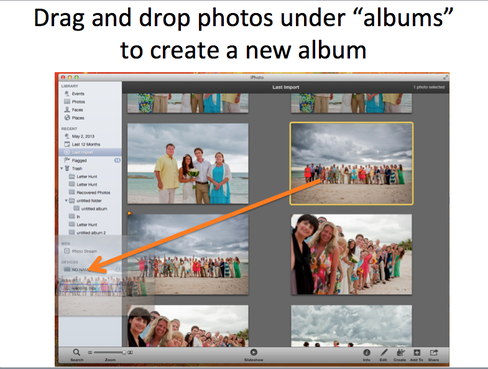
- To make a new album, simply drag and drop a photo (or group of photos) into a blank area below where it says "Albums" on the left-hand side of iPhoto.
- Then re-name you folder "iMovie" and add more photos to it by dragging and dropping.
- You can also drag and drop Photoshop projects (.JPEGs) saved in your pictures folder into your album.
- Aim for roughly 20-40 photos.
step 2: create new project in imovie
- Open iMovie.
- It should be on your dock along the bottom of your desktop.
- If not, look for it in your Launchpad (silver rocket ship)
- It should be on your dock along the bottom of your desktop.
- If not, look for it in your Launchpad (silver rocket ship)
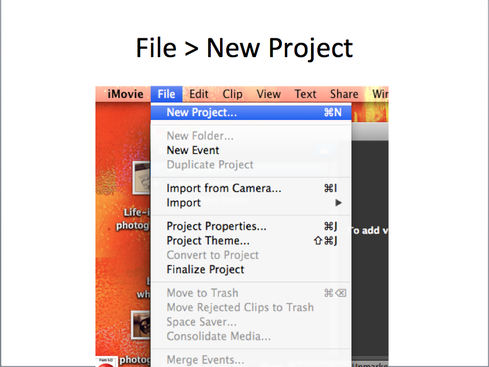
- Once in iMovie, go to File > New Project
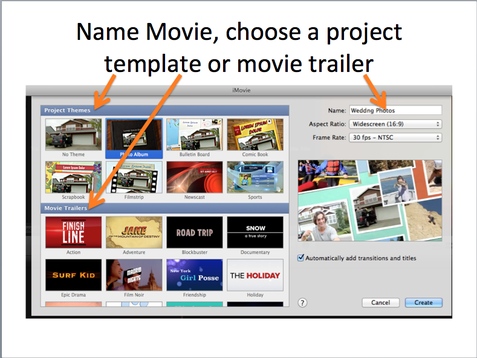
-Name your movie in the top right hand corner, where it says "Name"
- Choose a template from the top, or a movie trailer style from the bottom. Or you may select "No Theme" to start with a blank slate and do it all yourself.
- Click Create.
- Choose a template from the top, or a movie trailer style from the bottom. Or you may select "No Theme" to start with a blank slate and do it all yourself.
- Click Create.
step 3- add photos
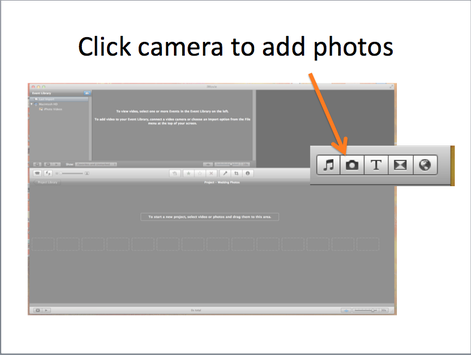
- Look for the camera button and click it to add photos.
- Your iPhoto Library should appear.
- Find and select the album you created.
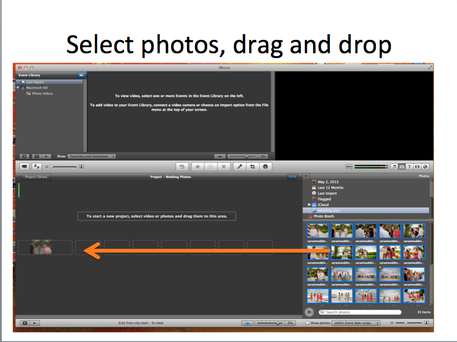
- Drag and drop each photograph into the project area one at a time or highlight several or all photographs at once.
- Find and select the album you created.
- Drag and drop each photograph into the project area one at a time or highlight several or all photographs at once.
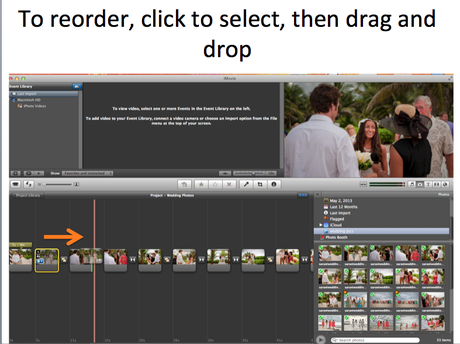
- You can still re order and re arrange your photos once they've been added.
- Click the photo once to select it (it will be highlighted in yellow) and then drag and drop it where ever you like.
- Click the photo once to select it (it will be highlighted in yellow) and then drag and drop it where ever you like.
step 4- add music
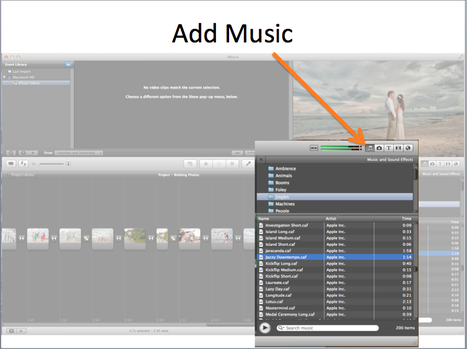
- Add music to your slide show!
- To add music, click on the music note button.
-NOTE: since we don't have our own personal iTunes Libraries on these computers, there isn't the best selection of songs. Many of the files available are short sound effects and not songs. Notice the "Time" for each file to the right, and pick one with a longer duration. You may have to repeat the song a few times or choose a few.
-Drag and drop your song into your movie.
- Drag and drop it again to repeat it.
IMPORTANT! PLEASE USE HEADPHONES WHEN ADDING MUSIC! (There are headphones in the case on top of the camera case if you need to borrow them)
step 5- add a title slide and text to your images
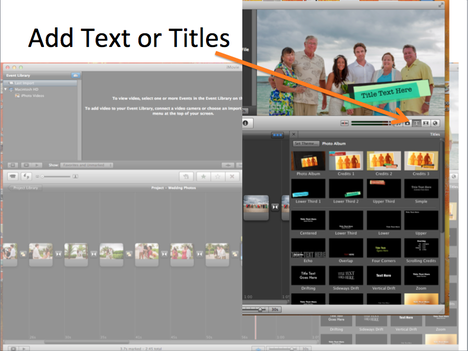
- Add a title for your slide show ("Digital Photo with Mrs Cook is Awesome" perhaps?)
- Click the "T" button.
- You can drag and drop your title on top of a photo, or you may choose to add your title to a blank background instead (See next step)
- Try making a title for your movie, titles for each of your photos, or add a "movie credit" at the end of the show.
- Click the "T" button.
- You can drag and drop your title on top of a photo, or you may choose to add your title to a blank background instead (See next step)
- Try making a title for your movie, titles for each of your photos, or add a "movie credit" at the end of the show.
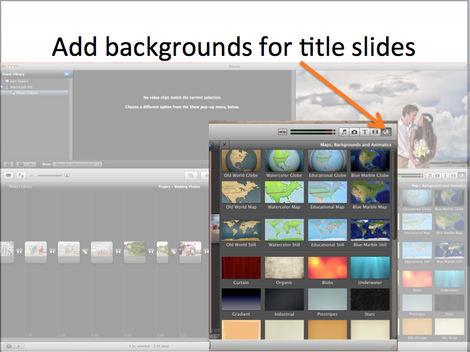
- To add a background for a title slide, click on the button that looks like a globe.
- Pick a background you like, and drag it into the desired position in your slide show.
- Then go back and to the title section and drag and drop a title onto your background.
- Pick a background you like, and drag it into the desired position in your slide show.
- Then go back and to the title section and drag and drop a title onto your background.
step 6- other optional edits...
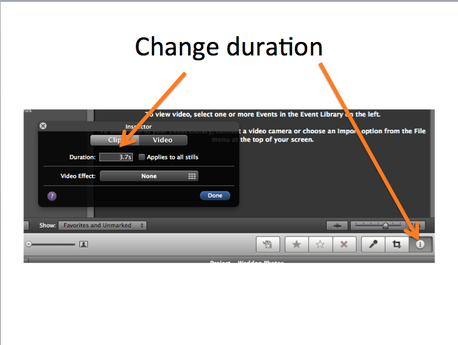
- You can change the amount of time each photo is displayed for by changing the "Duration"
- Click on the "Photo Inspector" button (looks like an "i" in a circle)
- Change the duration. (Somewhere between 3-5 seconds is usually fine.)
- Click on the "Photo Inspector" button (looks like an "i" in a circle)
- Change the duration. (Somewhere between 3-5 seconds is usually fine.)
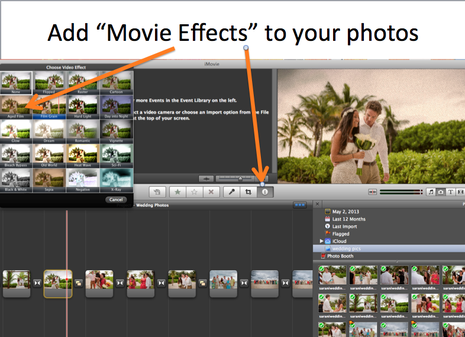
- You can also add filters to your photographs here.
- To do this, look for "Movie Effects" underneath "Duration" in the Photo inspector.
- To do this, look for "Movie Effects" underneath "Duration" in the Photo inspector.
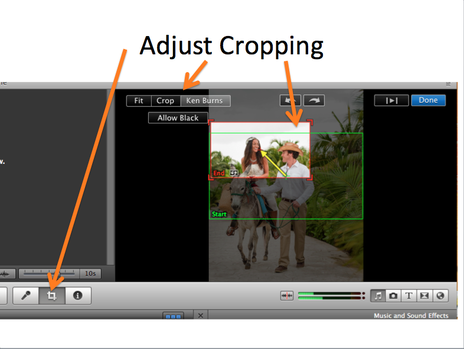
- Your photographs are automatically displayed using something called the "Ken Burns Effect." This effect zooms in on a part of your image while it is displayed, instead of showing the entire image. You may keep this effect on or turn it off.
- To turn it off, select the crop button. Then select "Fit" or "Crop" from the top-left corner.
- If you choose to leave the Ken Burns effect on, you can adjust which part of your image it zooms in on/ or how much/little it zooms in. To do this, make sure Ken Burns is selected, then drag in/out the red and green boxes on your image to change where the starting view and ending view is.
- You can preview the effect by clicking on the preview button in the top right hand corner.
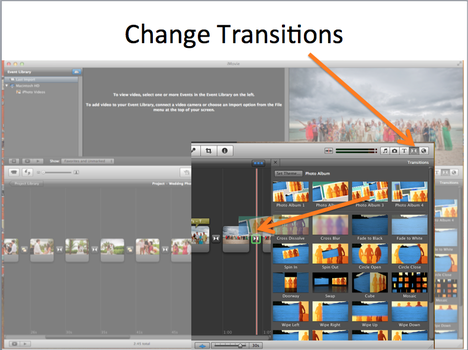
- If you want, you can try out different transition styles in-between slides.
- Click on the transitions button and drag and drop the transition in between any 2 photos.
- Click on the transitions button and drag and drop the transition in between any 2 photos.
step 7- export and enjoy!
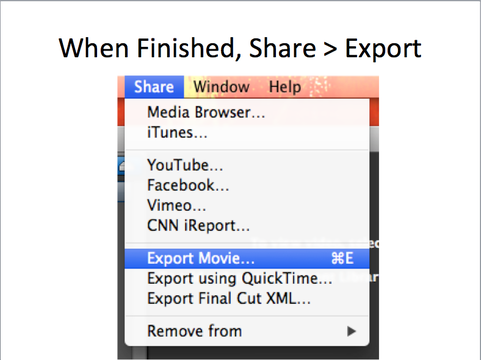
- When you are done, go to Share > Export Movie...

- Save your movie to your Desktop.
- Next to "Size to Export" select "Medium"
- Then hit Export.
- Next to "Size to Export" select "Medium"
- Then hit Export.
|
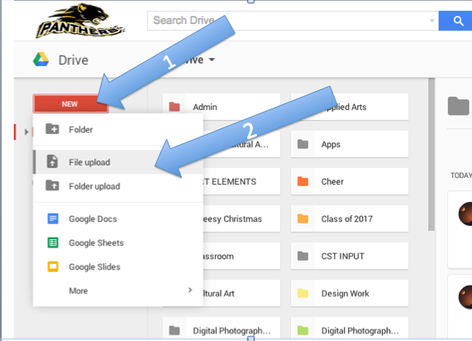
-Once you have your movie saved to your desktop, upload it to your Google Drive so you can easily "take it home."
- Log on to Google Drive. - Click the big red "NEW" button. - Click "File Upload" - Find your file on your Desktop (or wherever you saved it) |

- That's it! Take your movie home and show your friends and family what you made this semester!
- You can also upload your photo to your blog, Facebook, Youtube, etc.
- You can also upload your photo to your blog, Facebook, Youtube, etc.
