objective: sw use the quick selection tool and motion blur filter in photoshop to create the illusion of panning.
shooting instructions:
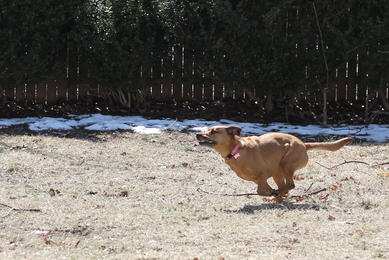
- Take a photograph of a moving subject. Subjects that are running perpendicular to you or jumping work best.
- Take your shot using Tv Mode and a fast shutter speed to FREEZE the action.
-Your shot- both subject and background- should be sharp and clear.
- Take your shot using Tv Mode and a fast shutter speed to FREEZE the action.
-Your shot- both subject and background- should be sharp and clear.
photoshop instructions:
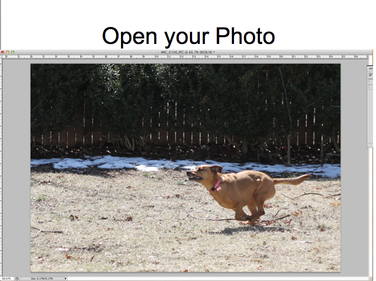
- In Photoshop, go to File > Open to open up your photograph.
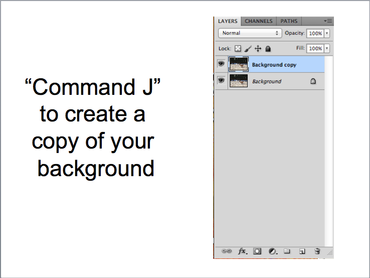
- First, make a copy of your background layer by pressing "command" and "J" on your keyboard.
- We will work on the top layer ("background copy") so make sure that it is selected (highlighted in blue)
- We will work on the top layer ("background copy") so make sure that it is selected (highlighted in blue)
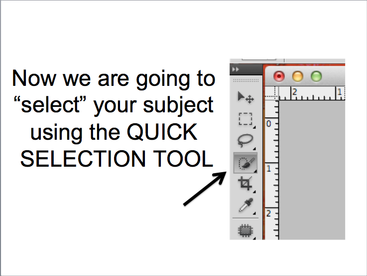
- We are going to use a tool called "Quick Selection" to select our moving subject.
- The Quick Selection tool is located in the tool bar on the left-hand side of your workspace. It is the 4th tool down and looks like a paint brush with a circle of dotted lines around the tip.
- Click the Quick Selection tool to activate it.
- The Quick Selection tool is located in the tool bar on the left-hand side of your workspace. It is the 4th tool down and looks like a paint brush with a circle of dotted lines around the tip.
- Click the Quick Selection tool to activate it.
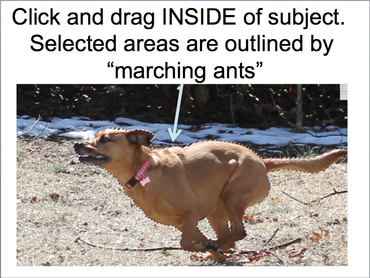
- To select your subject, click and drag INSIDE of the subject.
- As you do so, dotted lines or "marching ants" will appear around the edges of your object.
- Keep clicking and dragging inside of your subject until all of it is selected.
- As you do so, dotted lines or "marching ants" will appear around the edges of your object.
- Keep clicking and dragging inside of your subject until all of it is selected.
quick selection tool tips:
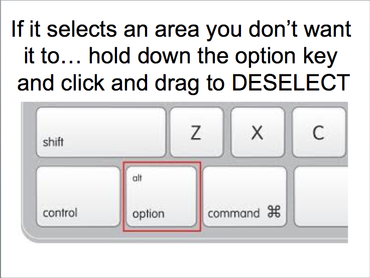
- If Photoshop selects an area of your photo that you DO NOT want selected, you want to SUBTRACT from selection by holding down the option key on your keyboard as you click and drag inside the area you want to subtract or remove from selection.
- When you release the option key, quick selection will revert back to "adding to selection" when you click and drag.
- When you release the option key, quick selection will revert back to "adding to selection" when you click and drag.
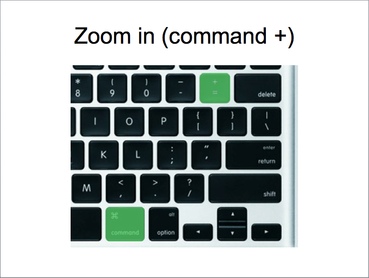
- When working on small, hard to select areas, you should ZOOM IN.
- To quickly zoom in, press "command" and "+" on your keyboard.
- To zoom back out again, press "command" and "-" on your keyboard.
- To quickly zoom in, press "command" and "+" on your keyboard.
- To zoom back out again, press "command" and "-" on your keyboard.
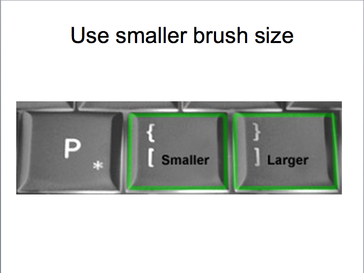
- When working on small, hard to select areas, you should also DECREASE YOUR QUICK SELECTION BRUSH SIZE.
-To quickly change your brush size, press the bracket keys on your keyboard.
- The left bracket will make your brush size smaller.
- The right bracket will make your brush size larger.
-To quickly change your brush size, press the bracket keys on your keyboard.
- The left bracket will make your brush size smaller.
- The right bracket will make your brush size larger.
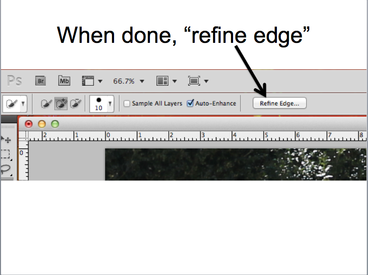
- When you have finished carefully making your selection, press the "Refine Edge..." button found in your options tool bar.
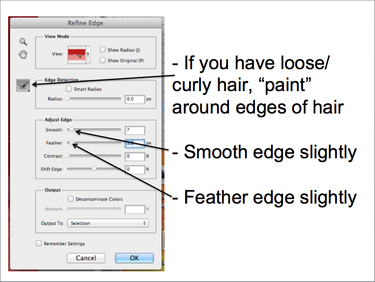
- If your subject has any "hard to select" edges- such as loose, wavy or curly hair- you will want to paint around those edges to help Photoshop better select it (see below).
- Also, since we will be adding quite a bit of blur to the photograph, our subjects edges shouldn't look perfectly sharp- it would appear unnatural... so...
- Under "Adjust Edge" increase the "Smooth" slider by a few pixels (a little goes a long way!)
- Also, increase the "Feather" slider by a few pixels (again, not too much... a little goes a long way!)
- Click OK when done.
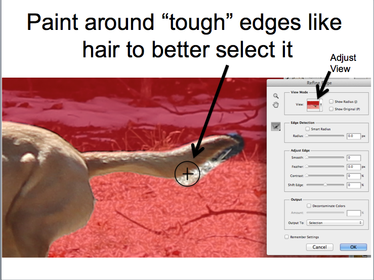
- If you need to paint around the edges of hair, move your mouse's point over the image preview.
-When placed over the image, you should see a circle with a plus sign in it appear. This is your brush.
-You can increase or decrease the brush size with your bracket keys.
-Then paint on the edges that need to be refined.
-Photoshop will try to more accurately select the fine edges of the hair.
- If you can not clearly see what is being selected, you can change the appearance of your background by clicking on "Adjust View."
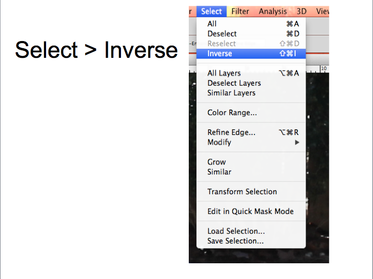
- When you are done refining your edges, we are going to select EVERYTHING BUT the subject. To do this...
- Go to Select > Inverse.
- This will "invert" your selection so that our subject is no longer selected but instead has the background selected... this is where we will apply our motion blur.
- Go to Select > Inverse.
- This will "invert" your selection so that our subject is no longer selected but instead has the background selected... this is where we will apply our motion blur.

- Go to Filter > Blur > Motion Blur.
- A Motion Blur box will appear.
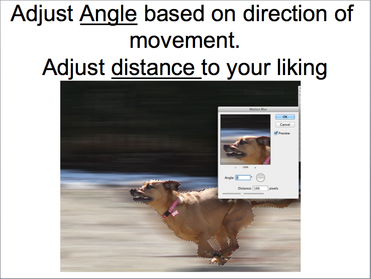
- First, make sure the angle of blur is appropriate for the direction of your subjects movement.
-For example, an angle of 0 degrees would be appropriate for someone running across the frame, while an angle of 90 degrees would be appropriate for someone jumping up and down.
- The use the bottom slider to adjust the "distance" of the blur. The more distance you add, the more dramatic your blur will be. Also, the more distance you add, the faster your subject appears to be moving.
- Click OK when done.
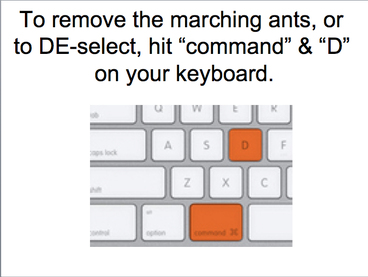
- You may notice that your "marching ants" still appear around your subject.
- To remove this, you need to "de-select"
- To de-select, press "command" & "D" on your keyboard.
- To remove this, you need to "de-select"
- To de-select, press "command" & "D" on your keyboard.
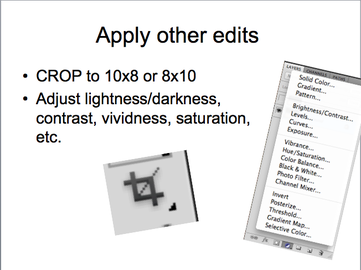
- Now crop your image to 10x8 300 res or 8x10 300 res.
- Apply any other edits to your photograph to improve it.... lighten, darken, contrast, saturation, color balance, etc.
- Apply any other edits to your photograph to improve it.... lighten, darken, contrast, saturation, color balance, etc.
- Save your work twice.
- Change your file name to "Motion Blur"
- Save your files to your "Pictures" folder.
- Save one version as a Photoshop format or Photoshop Document (.psd).
- Save your second copy as a JPEG (.jpg)
- See Schoology.com for instructions on submission.
- Only submit JPEGs to schoology. .PSDs will not be accepted.
