objective: Students will create a beaded bracelet using the traditional looming techniques of the native americans.
Important terms:
WARP THREADS
Warp threads, or simply warps, are the long, vertical threads or cords that support your beadwork when you bead on a loom. You prepare your loom for beading by first warping it, which means that you attach all of the warp threads to the loom before you stitch on any beads.
Warp threads, or simply warps, are the long, vertical threads or cords that support your beadwork when you bead on a loom. You prepare your loom for beading by first warping it, which means that you attach all of the warp threads to the loom before you stitch on any beads.
WEFT THREADS
In loom beading, the weft thread, or simply weft, is the thread you use to stitch beads onto the warp threads. Whereas the warp threads run vertically and are attached to your loom frame, the weft runs horizontally and is not attached to the frame.
In loom beading, the weft thread, or simply weft, is the thread you use to stitch beads onto the warp threads. Whereas the warp threads run vertically and are attached to your loom frame, the weft runs horizontally and is not attached to the frame.
Steps:
create a design!
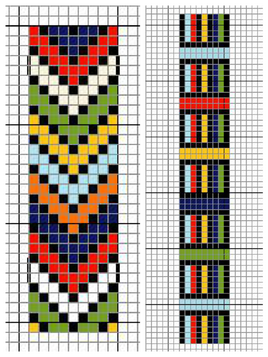
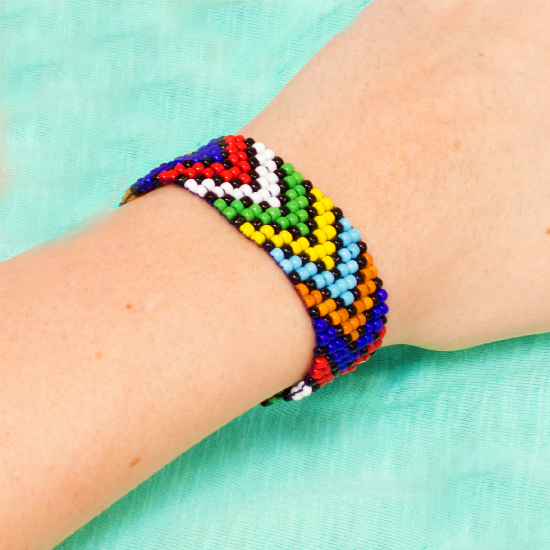
Use the bracelet planning graph paper to create a design for your bracelet to follow. Your bracelet should be at least 5 beads wide. You may make your bracelet as wide as you like but keep in mind that the wider it is, the more time it will take to complete. Use colored pencils or markers to plan out each color bead.
Put your name on your grid sheet and keep in your sketchbook.
Put your name on your grid sheet and keep in your sketchbook.
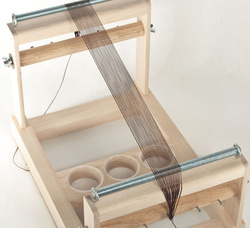
setting up your loom
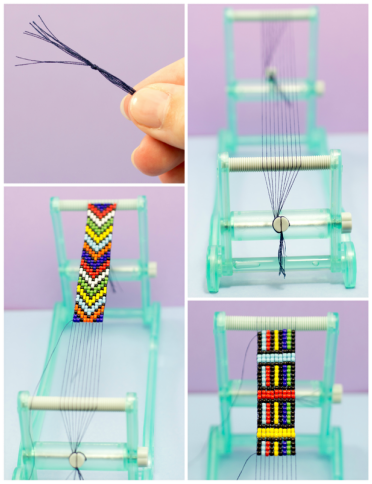
Step 1~ Firstly, before you set up your loom with thread, decide how wide you want your bracelet to be. Once you've decided you'll need one strand of thread for every bead plus one. For example, the pictured bracelet uses 9 beads, so 10 strands of thread would be needed.
Measure your strands of yarn that they are all 22 inches long. Then you'll want to gather one end of the threads together and tie them in a basic knot about one inch from the end. Trim the ends if necessary to make them neat.
Step 2~ Start by wrapping the threads around the stem of the metal knob on one end of the loom several times. Then taking your threads pull them up and over the top bar of your loom. Then turn your loom around so that you can pull the threads towards you while arranging them evenly on the groves.
{Note: Do not worry if the threads aren't perfectly placed in the middle. This won't affect the outcome.}
Step 3~ Pull the threads down and over the bottom end, making sure to space your threads out evenly once again. NONE of the threads should cross over each other. Then wrap the remaining thread around the stem.
Starting your bracelet
Step 1~ Start of by threading your needle with long amount of thread. Tie the tread to the "eye" of your needle, to avoid it falling off and having to constantly re-thread it.
{Note: Your bracelet will probably need about 80 inches of thread total, I suggest starting out with a shorter length to avoid it knotting up. When you run out of thread, you can re-thread your needle with more and tie the end to where your last thread left off to connect them.}
Taking the end of your thread, tie it onto the top left-most warped thread leaving about a 2 inch tail.
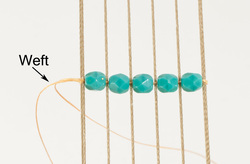
Step 2 ~ Thread your first row of beads onto your needle and beading thread, then pull the beads under the warped threads, push them up between the warped threads and weave your needle back through them making sure to guide the needle OVER the warped threads.
Watch the following video to see what I mean...
{Note: Your bracelet will probably need about 80 inches of thread total, I suggest starting out with a shorter length to avoid it knotting up. When you run out of thread, you can re-thread your needle with more and tie the end to where your last thread left off to connect them.}
Taking the end of your thread, tie it onto the top left-most warped thread leaving about a 2 inch tail.
Step 2 ~ Thread your first row of beads onto your needle and beading thread, then pull the beads under the warped threads, push them up between the warped threads and weave your needle back through them making sure to guide the needle OVER the warped threads.
Watch the following video to see what I mean...
Finishing off your bracelet
Side One:
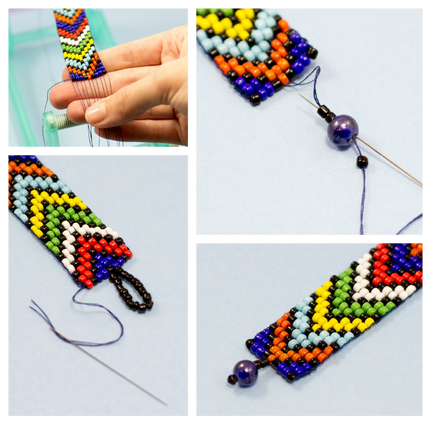
Step 1~ When your bracelet is long enough, unwind it at the bottom of the loom and take it off of the loom.
Step 2~ Start with one end of your bracelet, then thread an outside warp/thread onto your needle and weave it into your bracelet. Weave all but the 2 center warp threads into your bracelet. You'll be usng these to create fasteners.
Step 3~ Thread both center threads onto your needle. Then thread 2-3 seed beads onto your needle, followed by a large round bead, and then 1 more seed bead. Push your needle back through ONLY the round bead and 2-3 seed beads. Then weave remaining thread in 2 inches. Cut of any excess thread.
Side Two:
Step 1~ Now go to the other end, and repeat Step 1 and Step 2 of Side One.
Step 2~ Thread both your center threads onto your needle. Thread between 15-20 seed beads onto your thread. Push your needle through the first bead, and pull tight. Before weaving in the threads into your bracelet, check if the seed bead loop isn't too big or too small for your bead on Side One. It should be just big enough to slip over the bead easily. Add or remove beads until you get the right size.
Step 3~ Weave the remaining thread in 2 inches. Cut of any excess thread.
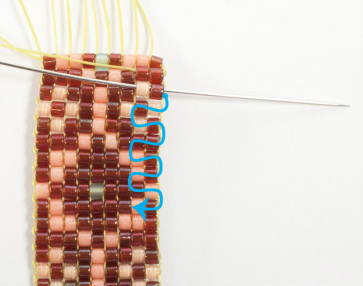
"Weaving in" the Warp Threads:
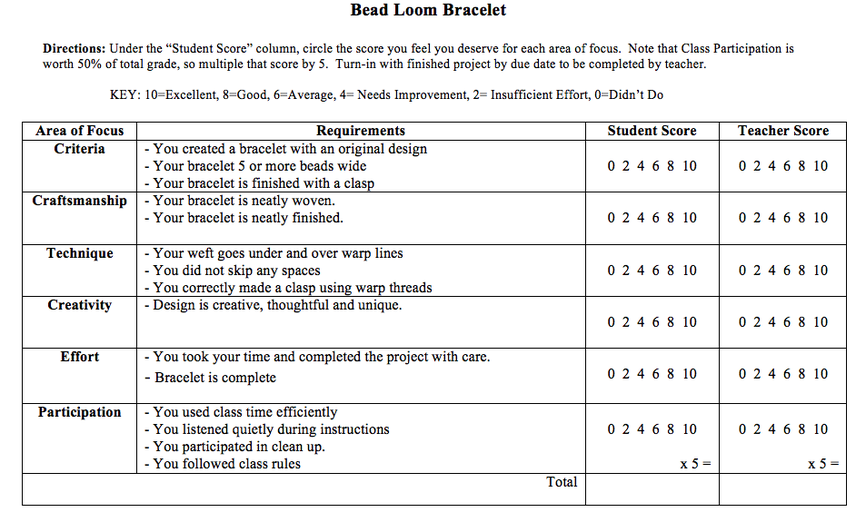
Assessment: