Objectives: Students will understand how to open an image in photoshop, how layers work and how to save their work.
Your assignment:
American Express used to run an ad campaign called "My Life. My Card." Each ad would feature a celebrity- showcasing a portrait of them in their natural environment and a personal survey filled out by hand. Look through the gallery below to see some examples.
For your assignment, you will make your own version, called "My Life. My Art."
For homework, have a friend or a family member shoot you in your natural surroundings. The photograph should be CANDID. This means not posed or formal looking. It should look as if we caught you off-guard doing something you would normally be doing.
Your photo should also tell us something about you! Where you come from, what your interests are, your personality, what an average day in your life is like, etc. This is our chance to get to know you!
Some ideas....
You can take this picture with any kind of camera you have available to you- yours or your parents' digital camera or even a camera on your smart phone or tablet will do! If you don't have any camera to use, see me and I will sign you out a class camera to borrow!
You will have to bring in your final digital image to class. I suggest saving it to a cloud storage device ( Schoology, Google Drive, Dropbox, etc.) or bringing it in on a flash drive. You could also e-mail it to yourself, but make sure to e-mail it as the original (large) file size, not a smaller compressed version.
In class, we will use Adobe Photoshop to insert our photo into a similar format as the "My Life. My Card." ad. From there we will print them, fill them out with info about ourselves and our interests, and hang them up in our room!
For your assignment, you will make your own version, called "My Life. My Art."
For homework, have a friend or a family member shoot you in your natural surroundings. The photograph should be CANDID. This means not posed or formal looking. It should look as if we caught you off-guard doing something you would normally be doing.
Your photo should also tell us something about you! Where you come from, what your interests are, your personality, what an average day in your life is like, etc. This is our chance to get to know you!
Some ideas....
- You at your desk working on your homework.
- You hanging out with your friends or family.
- You preparing for or playing your favorite sport or extra-curricular activity.
- You doing a favorite hobby of yours- playing a musical instrument, drawing, dancing, listening to music, etc.
- You getting ready to go to school in the morning- brushing your teeth, doing your hair, eating breakfast.
- You in your messy bedroom.
- You playing with your pets.
- Make your facial expression reflect your personality... are you silly? serious? happy?
You can take this picture with any kind of camera you have available to you- yours or your parents' digital camera or even a camera on your smart phone or tablet will do! If you don't have any camera to use, see me and I will sign you out a class camera to borrow!
You will have to bring in your final digital image to class. I suggest saving it to a cloud storage device ( Schoology, Google Drive, Dropbox, etc.) or bringing it in on a flash drive. You could also e-mail it to yourself, but make sure to e-mail it as the original (large) file size, not a smaller compressed version.
In class, we will use Adobe Photoshop to insert our photo into a similar format as the "My Life. My Card." ad. From there we will print them, fill them out with info about ourselves and our interests, and hang them up in our room!
my Life. My card. examples
student examples
Putting your image together in photoshop...
STep 1: download template
|
-Click "Download File" to the left to download the My Life. My Art. Template you will be using. The file should download into your computer's "Downloads" folder.
| ||
Step 2: place your photo into template using photoshop
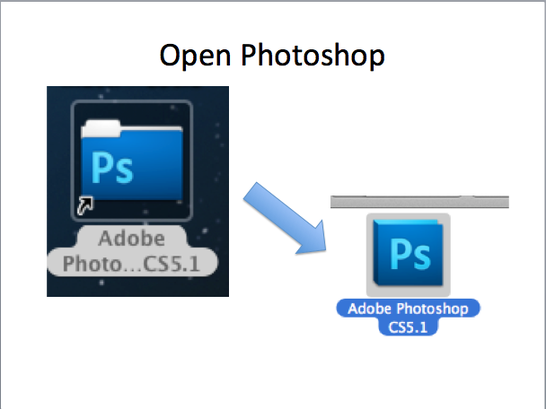
- Open up Photoshop.
(You can find it on the right-had side of your desktop, or by clicking on your "Launchpad" and scrolling through your programs. Your launchpad is found on the bottom left-hand side of your dock at the bottom of your desktop.)
(You can find it on the right-had side of your desktop, or by clicking on your "Launchpad" and scrolling through your programs. Your launchpad is found on the bottom left-hand side of your dock at the bottom of your desktop.)
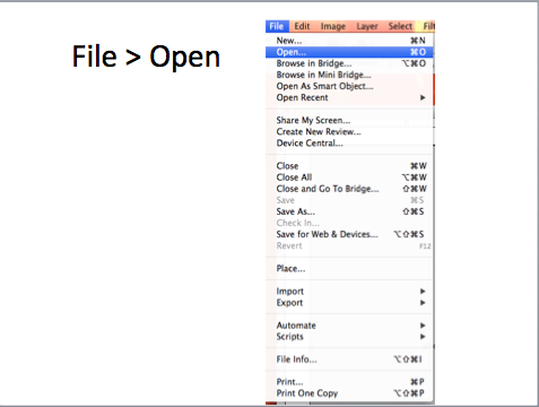
-Go to File, then Open..
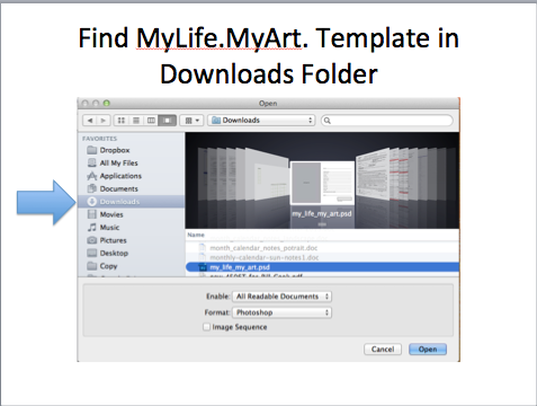
- Open up your My Life. My Art. Template.
- Find it by clicking on your "Downloads" folder found on the left-hand side of the box.
- Find it by clicking on your "Downloads" folder found on the left-hand side of the box.
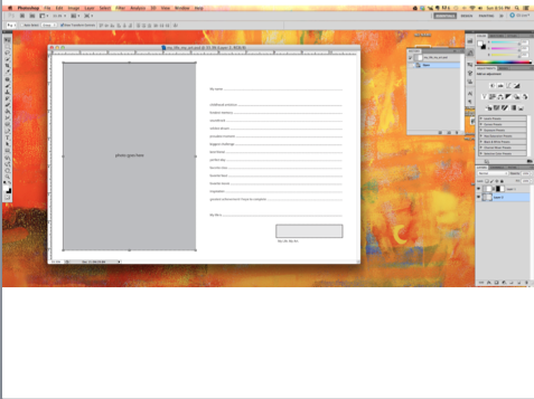
- This is your Photoshop workspace.
- Your template is found in the center of your workspace, in what we call the "Document Window."
- On the left-hand side of the workspace you have your "Toolbox" where all of your tools are located.
- In the bottom right-hand corner, you have what's called your "Layers Panel." This is where you can select and organize all of the various layers that make up your final image.
- At the very top of the screen you have your Menu Bar, under which is your Application Bar, followed by the Options Bar underneath that.
- Now lets place our self portrait photograph inside our template.
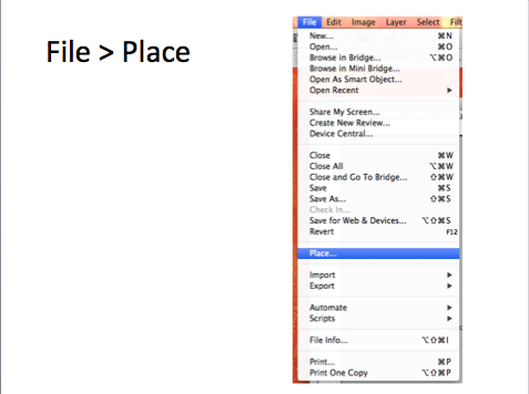
- To insert a photo inside of an already open document window, we need to "place" it.
- Go to File, then "Place.."
- Find your image, it should be saved in your PICTURES folder, then "Open.."
- To insert a photo inside of an already open document window, we need to "place" it.
- Go to File, then "Place.."
- Find your image, it should be saved in your PICTURES folder, then "Open.."

- Photoshop will place your photo inside your document window.
- Look in your OPTIONS BAR for the "Check Mark."
- Click the check mark to CONFIRM that you want to place your image here.
- Look in your OPTIONS BAR for the "Check Mark."
- Click the check mark to CONFIRM that you want to place your image here.
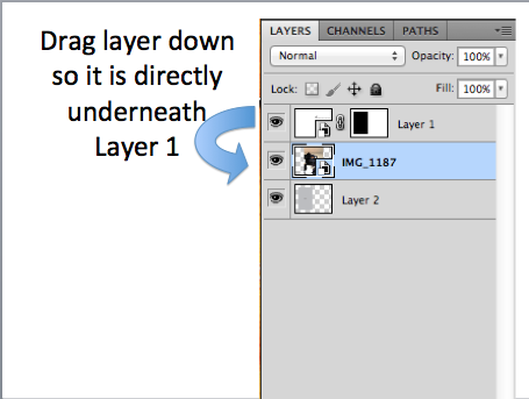
- Right now our image is probably ON TOP of our template. We want it underneath our template, so that it peaks through the opening on the left-hand side like a picture frame.
- The order of your layers matters! If our photo's layer is on top of the template's layer (layer 1), then it will appear that way in our document window as well. IF we drag our image layer underneath layer 1 in the layers panel, it will appear underneath it in the document window as well!
- Click and drag your new image layer so that it is UNDERNEATH layer 1 in the layers panel!
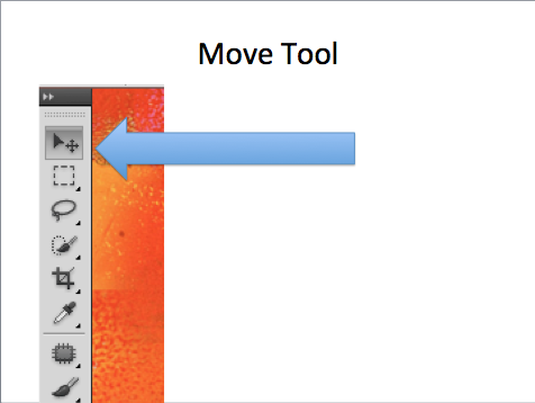
- Now we may need to move the image to fit in the window.
- Look at your TOOLBOX, and choose the MOVE TOOL. It is the first tool, all the way at the top of the toolbox.
- With the move tool, you can click and drag the image to reposition it.
(HINT: in order to move your self-portrait image, you first need to make sure that its layer is selected in the layers panel. Photoshop will only let you work on the layer that is selected, or highlighted in blue)
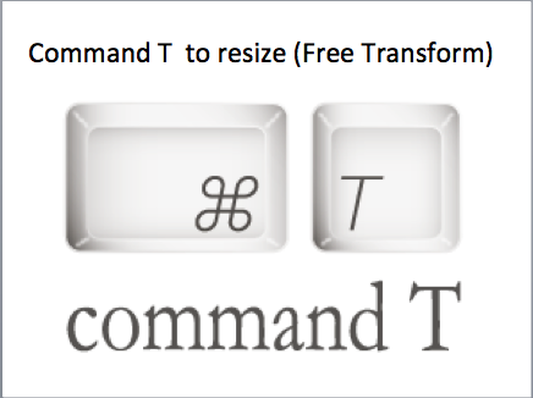
- If you need to RESIZE your image, use "Free Transform."
- You can find free transform by going to Edit in your Menu Bar, and choose Free Transform.
- Or use the keyboard shortcut... press the Command Key (next to space bar) and the "T" key.
- You can find free transform by going to Edit in your Menu Bar, and choose Free Transform.
- Or use the keyboard shortcut... press the Command Key (next to space bar) and the "T" key.
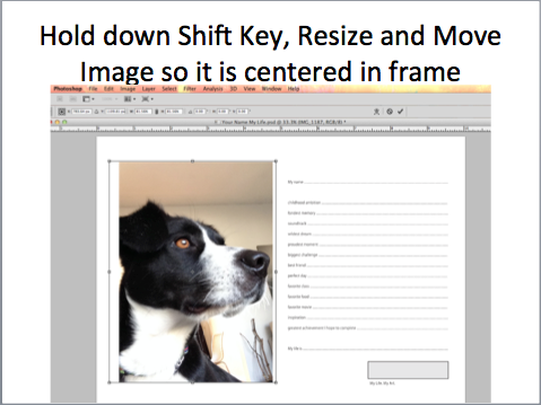
- Now you can click and drag the handles (boxes in the corners of your image) to resize your image.
- HOLD DOWN THE SHIFT KEY ON YOUR KEYBOARD WHILE YOU RESIZE. This will keep the image proportions the same (so you don't stretch out or squoosh your image, making it look warped)
- HOLD DOWN THE SHIFT KEY ON YOUR KEYBOARD WHILE YOU RESIZE. This will keep the image proportions the same (so you don't stretch out or squoosh your image, making it look warped)
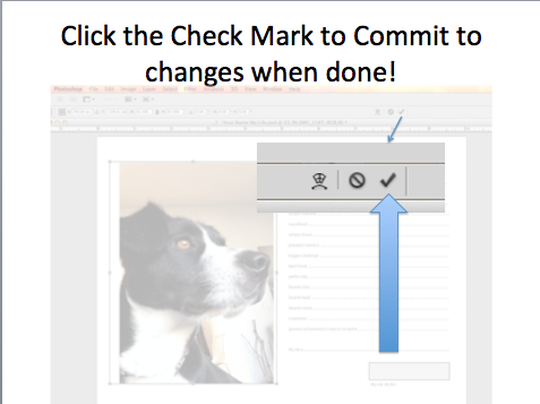
- When you are done moving your image, CONFIRM it by clicking the check mark in the OPTIONS BAR.
Step 3: save your work... twice!
IMPORTANT!! EVERY SINGLE TIME YOU WORK IN PHOTOSHOP, YOU WILL HAVE TO SAVE YOUR IMAGE TWICE FOLLOWING THE INSTRUCTIONS BELOW!
Photoshop's "native file format" is called a "Photoshop Document" or .PSD. You should always save your work as a .PSD because it will better allow you to go back and make changes to your image later, if you need to continue editing it another day. These are the files you will open in Photoshop to continue editing your work.
However, Photoshop Documents are extremely large files, and not suitable for uploading to the internet. So you will also have to save a .JPEG version of your projects as well. .JPEGs are compressed (smaller) files that are better suited for uploading to the internet. These are the files you will TURN-IN to Schoology- NOT .PSDs.
When saving your work, you should always change the file name to be " 'Your Name' 'Project Name' " . For example: JohnSmith MylifeMyArt.jpg
You should also always save your work to your PICTURES FOLDER. So that all of your final images and projects are stored in one place.
saving as a photoshop document
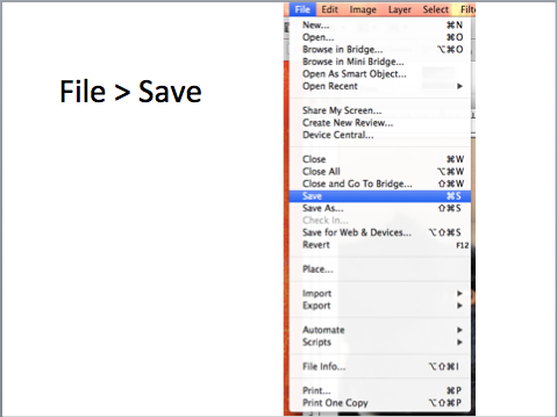
- Go to file, Save...
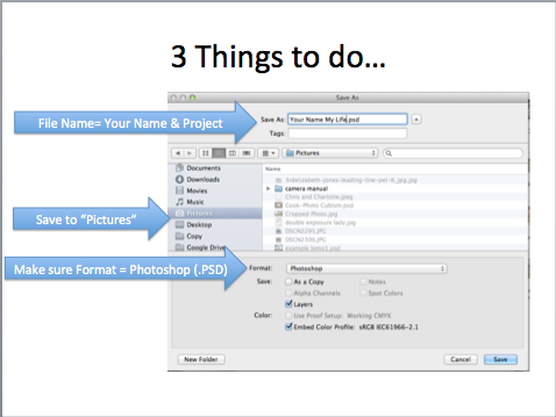
1.) Change file name to "Your Name Project Name" (for example: JohnSmith MyLifeMyArt)
2.) Underneath the file name, in the drop-down menu that says "Where," choose "PICTURES". (OR you could select the Pictures folder from the menu on the left-hand side, like shown)
3.) Towards the bottom, where it says "Format" make sure the format is set to "Photoshop"
Click Save! (a pop up box will come up, just click OK)
SAVING AS A .JPEG
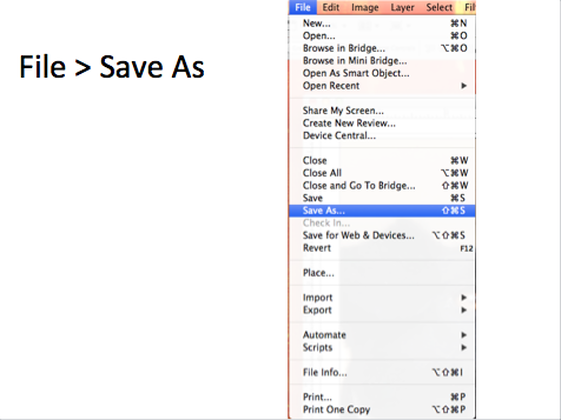
- Now go back to file, and select "Save As..."
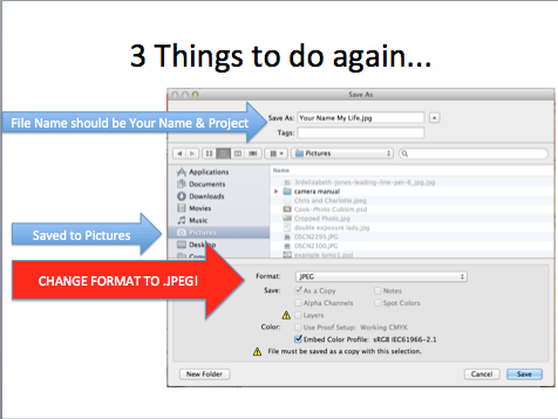
1.) Change file name to "Your Name Project Name" (for example: JohnSmith MyLifeMyArt)
2.) Underneath the file name, in the drop-down menu that says "Where," choose "PICTURES". (OR you could select the Pictures folder from the menu on the left-hand side, like shown)
3.) Towards the bottom, where it says "Format" make sure the format is set to ".JPEG"
Click Save! (a pop up box will come up, just click OK)
Step 4: print
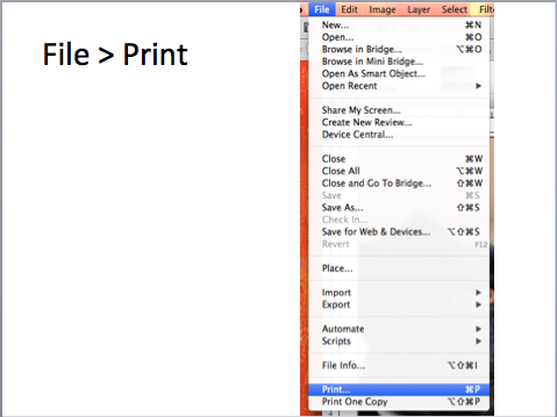
- Go to File, then Print.
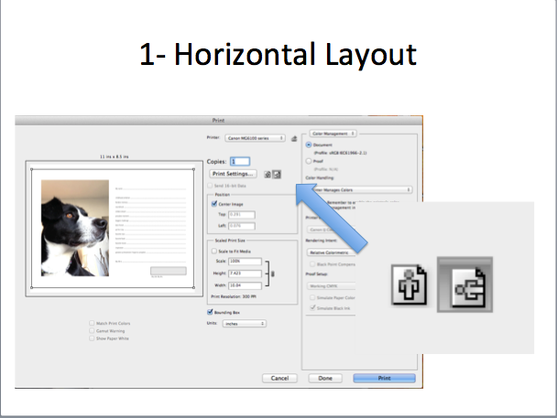
- Change the layout to Horizontal.
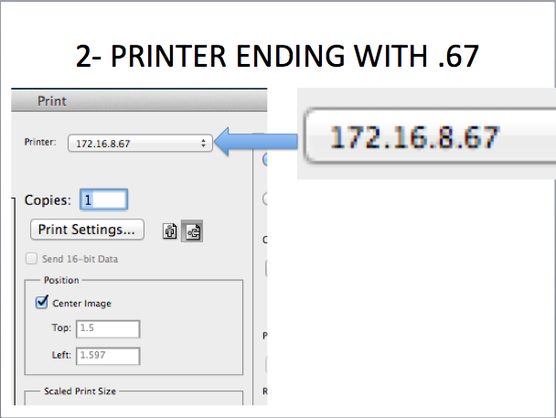
- In the drop-down box next to "Printer" choose number 172.16.8.67
- Click Print
- Click Print
step 5: fill out survey and hang up!

- Once you have printed your work, collect it from the printer.
- Use colored pencils, markers, etc. to fill in all of the survey questions. Feel free to make little doodles or anything to reflect your personality too!
- Use colored pencils, markers, etc. to fill in all of the survey questions. Feel free to make little doodles or anything to reflect your personality too!
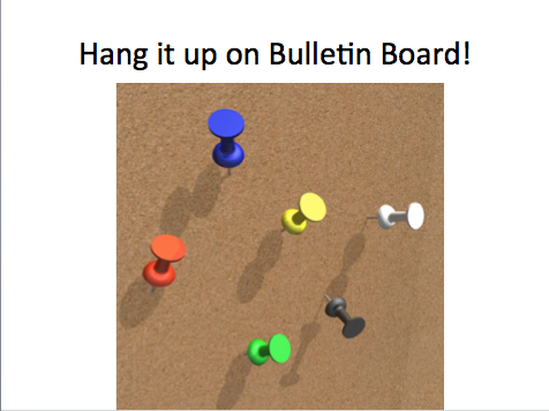
- When finished, hang your finished piece on the bulletin board!
- Check out your classmate's work and learn something new about them!
- Check out your classmate's work and learn something new about them!
