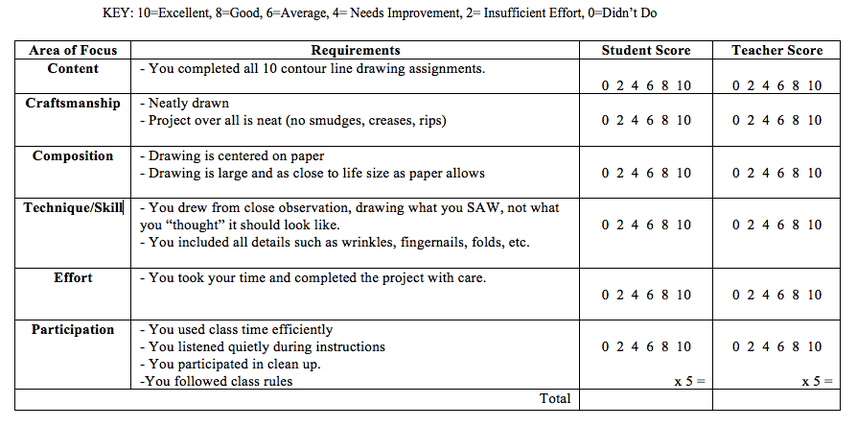
What is Contour LIne?
A contour is the line which defines a form or edge - an outline. Contour drawing is the place where most beginners start, following the visible edges of a shape. The contour describes the outermost edges of a form, as well as dramatic changes of plane within the form. Put simply, a contour line drawing is an "outline drawing," that uses no shading.
A contour drawing is done when the artist looks intently at the EDGES of an object, but rarely looks at the paper while the pencil moves. The goal of contour drawing is to make a line that is authentic and true to what you are actually seeing, and to train your hand to copy your eye's movement.
There are several different types of contour line drawings:
Blind Contour
'Blind contour drawing' is when contour drawing is done without looking at the paper AT ALL.
This helps train you to look more often at your subject than look at your paper. Staring down at your paper while drawing can be a hard habit to break~
This helps train you to look more often at your subject than look at your paper. Staring down at your paper while drawing can be a hard habit to break~
Continuous Line Contour
"Continuous line contour drawing' is a contour drawing done without picking your pencil off of the paper. It is essentially done with one long line. Continuous line contour drawings can be done 100% "blind" or not.
Modified Contour
A "modified contour line drawing" allows you to look at your paper and pick up your pen, using multiple lines instead of one.
Although not completely blind, the artist should only look at the paper 10% of the time, and at the object 90% of the time. The artist only looks at the paper to place their pencil when they start a new line.
Contour drawings use no shading, but lighter and darker tonal areas can be "suggested" by varying line width and pressure. Darker, thicker lines can be used in shadow areas, and lighter, thinner lines in lighter areas.
cross-contour
Cross contour lines are drawn lines which travel, as the name suggests, across the form. Cross contours follow the form of the surface area- using curved lines over curving or spherical planes, straight lines across flat surfaces, etc.
Why do them?
It is a classic drawing exercise to:
- capture the edges and details that we often overlook.
- develop good hand-eye coordination which is key when learning to draw. With regular practice, contour drawing exercises will help train your hand to follow your eye's movements.
- develop the right brain (creative side!) muscles, help it become more assertive and aware of the observable.
- balance the left brain's tendency to standardize, generalize, and simplify everything, which creates stereotypical ways of seeing and drawing.
How to do it:
- Look at the object! While you draw, look at the object 90% of the time (100% of the time if doing a BLIND contour). Look only at your paper when you are ready to make a new line on your paper and you are checking where to place it. Concentrate on practicing your hand-eye coordination instead of worrying about the look of your drawing.
- One continuous long line. do not lift the marker off the paper unless you go off the edge of the paper and hit the table or come to an absolute dead end. Whenever several lines meet, simple choose a direction and reconnect those lines later.
- Go as slowly as a snail. Draw slowly. If it helps, close one eye while you draw.
- Detail, detail, detail! Capture edges only, but capture as much information as you can! Capture every nook and cranny on paper. Each and every edge, crack, line, wrinkly, etc. that is possible to SEE.
- Work as close to life size as your sketchbook or paper will allow.
Some helpful videos...
YOUR ASSIGNMENTS:
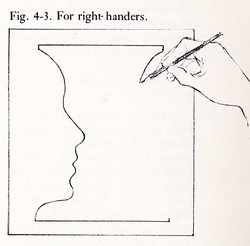
Vase Face Drawing
Time to work-out the right side of your brain! Draw a simplified side profile of a face. Now try to create a "vase-face" illusion by drawing that same profile in reverse on the other side.
To do so, you will have to employ the right side of your brain.
Go slowly!
Time to work-out the right side of your brain! Draw a simplified side profile of a face. Now try to create a "vase-face" illusion by drawing that same profile in reverse on the other side.
To do so, you will have to employ the right side of your brain.
Go slowly!
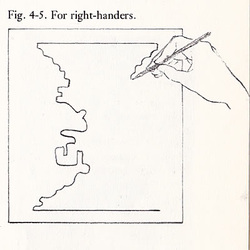
Monster Vase Face Drawing
We are going to complete a second vase-face drawing, only this time, make your face a "monster face." Try adding wrinkles, bulges, warts, big teeth, anything to make your face look like a monster!
Just like last time, after you complete the first profile, use the right-side of your brain to try to draw the profile again exactly, only in reverse.
Go slowly! Pay attention to detail!
UPSIDE DOWN CONTOUR drawing exercise
Try to copy a contour line drawing by look at it UPSIDE DOWN! This is another way to get you to actually SEE what you are drawing, instead of drawing what "you think you see."
Try to copy a contour line drawing by look at it UPSIDE DOWN! This is another way to get you to actually SEE what you are drawing, instead of drawing what "you think you see."
BLIND CONTOUR of hand with small object
Hold a small object- like pen or pencil- in your hand and do a BLIND CONTOUR drawing of it. DON'T CHEAT!! No looking at your paper until you are 100% done! It's going to look a bit silly, and that's ok! It's just an exercise :)
Remember to follow the outline slowly with your eyes and try to match that movement with your hand, this helps train your hand-eye coordination. Don't forget to draw all the little details, like finger nails and folds of skin!

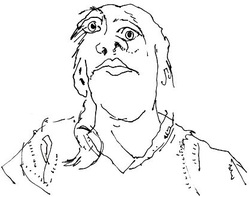
CONTINUOUS CONTOUR of hand with large object
Hold a tool or larger object in your hand and do a CONTINUOUS CONTOUR drawing of it. You can look at your paper now, but you still should be looking at your hand 90% of the time. Only glance down at your paper momentarily to check on your pencil placement.
You will have to do your entire drawing using only ONE LINE! Don't pick your pencil up off your paper until you are 100% done!.
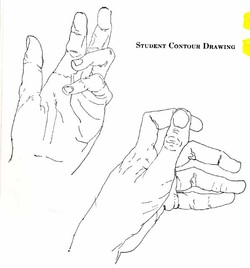
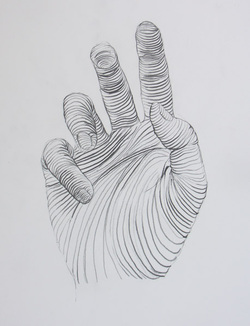
MODIFIED CONTOUR of hands
This time you will complete a modified contour drawing of hands. You may look at your paper 10% of the time. You may pick up your pencil and use as many lines as you need.
We will go over our drawing with marker when complete.
This time you will complete a modified contour drawing of hands. You may look at your paper 10% of the time. You may pick up your pencil and use as many lines as you need.
We will go over our drawing with marker when complete.
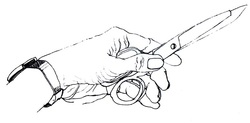
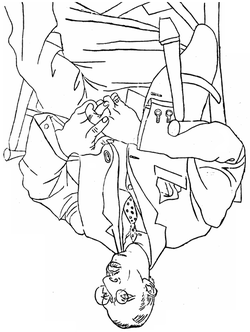
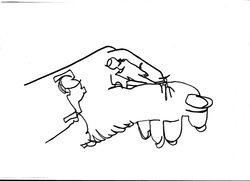
MODIFIED CONTOUR of hand holding scissors
This time you will complete a modified contour drawing of your hand holding a pair of scissors. You may look at your paper 10% of the time. You may pick up your pencil and use as many lines as you need. Make sure to include ALL details and go slowly!
We will go over our drawing with marker when complete.
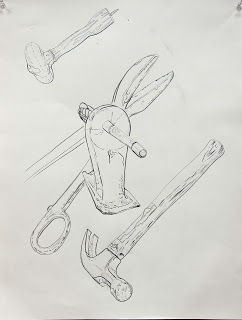
MODIFIED CONTOUR of hand holding scissors
Set up a still life (grouping) of various tools in front of you. Create a modified contour drawing of the tools in pencil. You may look at your paper 10% of the time. You may pick up your pencil and use as many lines as you need. Make sure to include ALL details and go slowly!
We will go over our drawing with marker when complete.

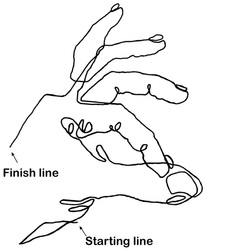
MODIFIED CONTOUR of still life with shoes
Set up a still life (grouping) of shoes in front of you. Create a MODIFIED CONTOUR drawing of the shoes in pencil. Remember to look at the shoes more than your paper! Include all of the details. Remember that you can "indicate" lighter or darker shadow areas by varying your line thickness. For example, to indicate a shadow under the shoe, thicken up your line there.
When you are done, neatly go over all your lines with fine-tip marker.
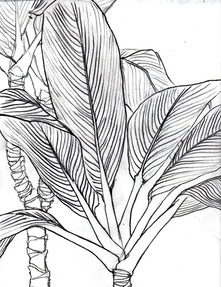
FINAL MODIFIED CONTOUR of plant still life
Your final contour line drawing will be a detailed drawing of a plant. Keeping your eyes on the plant more than your paper, complete your drawing in pencil. Go over your pencil drawing with black marker- varying your line width to indicate darker or lighter areas.
When complete, we will use colored pencils to add color to selective areas of our drawing.
assessment