Objectives: Students will use manual exposure mode to take properly exposed photographs.
Remember the exposure triangle?
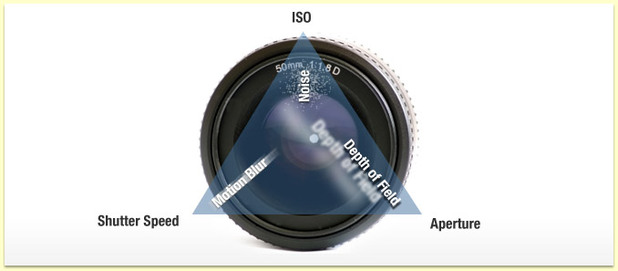
While shooting in Manual (M) Mode, you will have to control all 3 aspects of the exposure triangle: ISO, Shutter & Aperture, and make sure that they are all properly balanced to give you a correct exposure.
Remember:
Remember:
- ISO controls your camera's sensitivity to light and image quality (noise)
- Shutter controls your exposure and how you capture motion
- Aperture controls your exposure and depth of field
follow these steps when shooting in manual mode:
step 1: set your iso
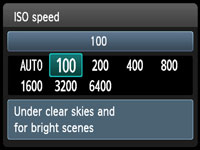
- Set your ISO by pressing the ISO button on the back of your camera (top arrow key). Then use the left and right arrow keys to choose an ISO setting. Press the "set" button when you have made your selection.
- If you are in a well-lit situation (outside on a sunny day) choose 100 or 200.
- If you are indoors, or if it is cloudy or darker out, use a slightly higher ISO, like 400 or 800.
- If you can help it, stay away from the highest ISOs (like 3200 and 6400), as they will produce "noise" in your image.
- When in doubt, you can set it to AUTO, but be aware that your camera may select a very high ISO, thus giving you noise and potentially ruining an image.
step 2: set your aperture
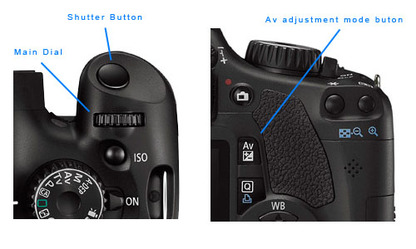
- The way you set your aperture in manual mode is by pressing the "Av" button on the back of your camera and rotating the main dial simultaneously.
- What aperture should you use? Use a wide-open aperture (small f #) if you want a shallow depth of field or if you need to let in a lot of light. Use a smaller aperture (larger f #) if you want a larger depth of field or don't need to let in as much light.
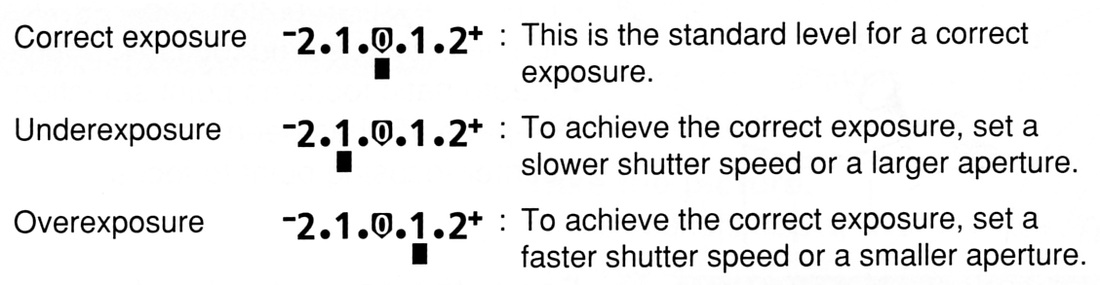
step 3: Focus your shot & Check exposure

- Look in your viewfinder, press shutter half-way down to focus and check your EXPOSURE INDEX at the bottom of your viewfinder, in the center.
- You want you EXPOSURE LEVEL MARK to be at ZERO for a correctly exposed image.
- If it is to the left of zero, your image will be too dark (underexposed) if it is to the right of zero, your image will be too bright (overexposed).
Step 4: Set your shutter speed

- To set your shutter speed, all you need to do is rotate your main dial.
- If your exposure index is indicating that you are UNDEREXPOSED, decrease your shutter to a SLOWER speed.
- If your exposure index is indicating that you are OVEREXPOSED, increase your shutter to a FASTER speed.
- KEEP IN MIND: Don't shoot slower than 1/60 without a tripod, and if you are shooting a subject that is moving or may move, expect motion blur.
- If it is too dark (underexposed) and you do not want to lower your shutter speed any lower (do to blur), adjust something else (wider aperture or higher ISO).
step 5: shoot!

- When your exposure level indicator reads zero, press the shutter button to shoot.
- Re-adjust your shutter, aperture, ISO as needed to achieve your desired effect (depth of field, motion, quality) and correct exposure for each shot.
practice first!
Practice using Manual Mode in the DSLR simulator below. You will have to set your Aperture, Shutter and ISO for each shot. The settings you choose will depend largely on what light you are shooting in. Experiment with different types of lighting to see how you will have to adjust each setting to compensate. Also notice how you are affecting motion blur and depth of field with each shot.
Your assignment: MANUAL MODE SCAVENGER HUNT
Shoot all of the following items on this scavenger hunt list in MANUAL (M) Mode. Remember to make sure each shot is correctly exposed (indicator reads zero) and that you have SHARP FOCUS in each shot.
1.) Shoot a macro shot of a plant with shallow depth of field.
2.) Shoot a landscape shot with wide depth of field.
3.) Shoot someone jumping in the air outside... freeze the action.
4.) Shoot someone spinning around in circles... create motion blur.
5.) Shoot a portrait with shallow depth of field that also follows the rule of thirds.
6.) Shoot something from an interesting point of view.
7.) Shoot a subject surrounded by leading lines.
8.) Shoot a subject and use framing.
9.) Shoot an object with good bokeh in the background.
10.) Shoot a person with good bokeh in the background.
11.) Shoot a photo of two people or two objects with shallow depth of field, so that only the person/object in the BACKGROUND is in focus.
* See Schoology.com for instructions on turning-in assignment
