objective: STUDENTS WILL PRACTICE THE MOST BASIC ASPECTS OF USING A DSLR CAMERA. STUDENTS WILL LEARN TO HOLD THE CAMERA CORRECTLY AND HOW TO USE MANUAL AND AUTO FOCUS MODES.
What is a "DSLR" Camera?
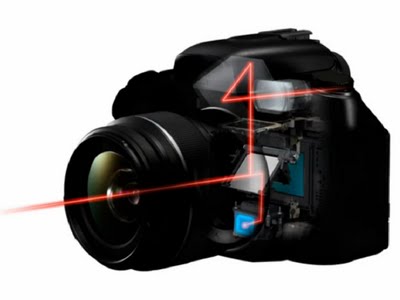
DSLR stands for Digital Single Lens Reflex, and it is a type of digital camera. These cameras can be expensive and are the type used by most professional photographers. They get their name from their unique viewing system, in which a mirror reflects light from the lens through a separate optical viewfinder. At the moment of exposure, the mirror flips out of the way, making a distinctive "clack"sound and allowing light to fall on the image sensor. This system allows you to see through the viewfinder exactly what your finished shot will look like, or WYSIWYG (what you see is what you get).
There are several advantages to using a DSLR camera over "point-and-shoots:"
- The lens is detachable, which means you can use different lenses for different types of shots.
- Better image quality- dslr cameras have bigger image sensors than compact cameras, which
means better over all quality - More artistic freedom- with dslr cameras, the photographer has more control over how an image
is recorded and thus more control over the outcome of the final image. Alternatively, compact
cameras will often "guess" how an image should be recorded and thus less control for the
photographer.
What are all these buttons for?!?
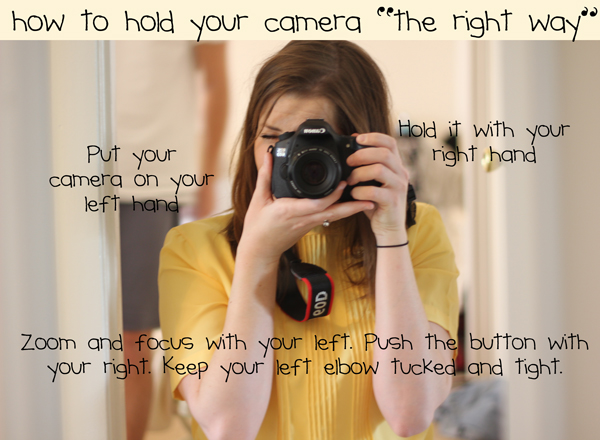
How to hold your camera
exposure modes
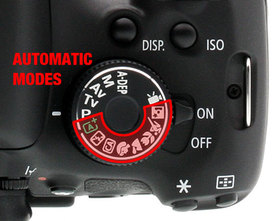
This is your Exposure Mode Dial. Your exposure modes fall into two basic categories:
1.) Automatic Exposure Modes (highlighted in red)
and 2.) Creative or Advanced Exposure Modes.
Until we learn a bit more about exposure settings, we will start out using the more basic modes- the automatic exposure modes. These modes will serve us fine while getting used to our cameras and learning how to frame and compose shots. As we learn more about exposure, however, we will rarely be using these modes- as they offer very little creative control over the final outcome of our images.
How to focus

How to use automatic focus
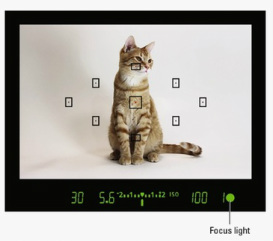
To use AUTOMATIC FOCUS:
- Make sure the Auto/Manual focus switch is switch to AF (Auto Focus)
- Look through the viewfinder, frame your subject in the center of the viewfinder.
- Press the shutter button HALF-WAY down, wait for a beep and the focus light to turn green- this indicates that the camera has focused.
- While still holding down the shutter half-way, you can reframe your subject if you wish (so that your subject is no longer in the center, if that's not what you want).
- Press the shutter button ALL THE WAY down to take your photo.
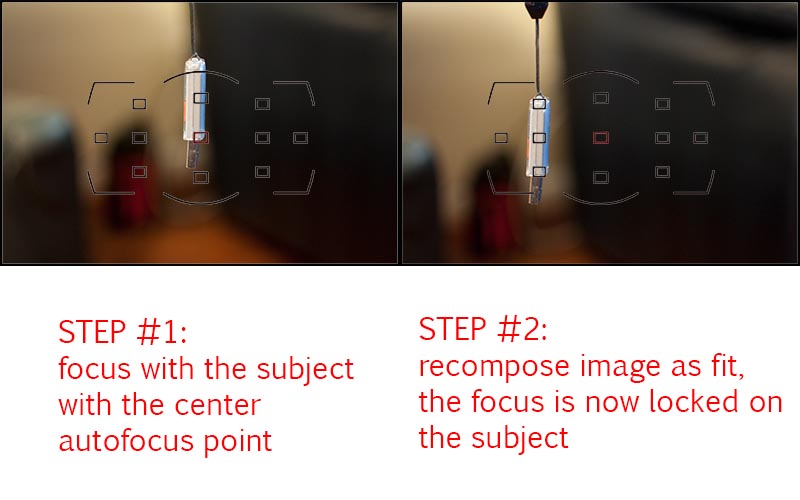
focus then recompose shot
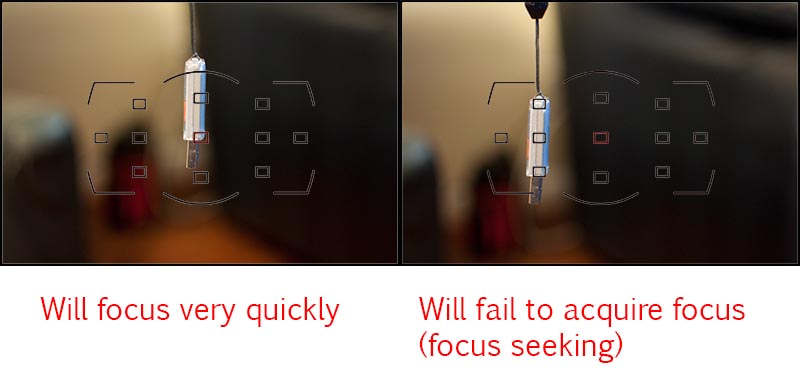
Focus on a "hard edge"
how to use manual focus
To use MANUAL FOCUS:
- Switch the Auto/Manual focus switch to MF (Manual Focus)
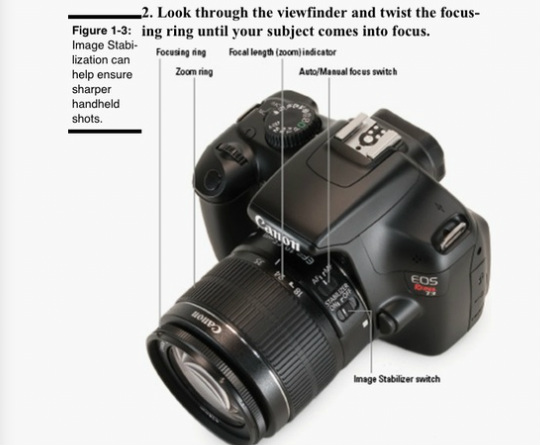
- Look through the viewfinder while twisting the focusing ring (at the very end of your lens) until your subject is in focus.
- Press the shutter to take your shot.
focusing tips:
TIPS:
- HAving trouble focusing on an object further in the distance? Autofocus tends to focus on the object closest to the lens, so if that's not what you're going for, try manual instead.
- Keep in mind that each lens has a "minimum focus distance." For our kit lens, that is around 11 inches. If you are closer than 11 inches away from your subject, you may have to move farther back to focus.
- Never twist the focusing lens while still in Auto Focus, you can damage the lens!
Zooming in
Our kit lens is what's called a "zoom lens," meaning that it can vary between shorter and longer focal lengths. Some other lenses are "fixed lenses" or fixed focal length lenses. These only have one focal length, and so can not zoom in and out.
If you need to zoom in:
If you need to zoom in:
- Do it the old fashioned way! With your feet! Move in closer!
- Twist the zoom ring on your lens (see photo above)
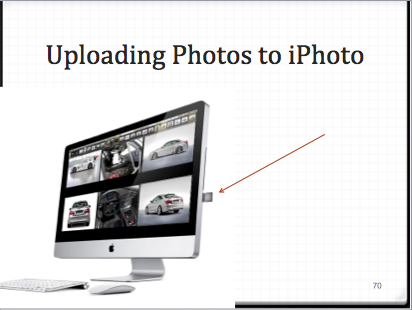
uploading photos to iPhoto
|
|
|
