objectives: students will use photoshop to create a self-portrait in the style of shepard fairey.
Shepard Fairey
Shepard Fairey is an American contemporary street artist, graphic designer, activist and illustrator who emerged from the skateboarding scene.
His most notable work was the Obama "Hope" poster from the 2008 Presidential campaign.
His most notable work was the Obama "Hope" poster from the 2008 Presidential campaign.
Your Assignment:
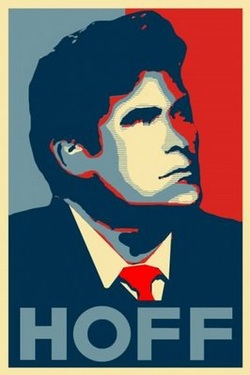
You will create a self-portrait in the style of the Obama Hope poster.
Your portrait can use the same colors as the original poster, or you can use different colors.
Your portrait can use the same colors as the original poster, or you can use different colors.
Shooting instructions:
- Portrait shot- of you or someone else.
- Focus on just a head shot, from the bust/shoulders up.
- Use a strong light source- sunlight from outside or by a bright window, or use a spot light in the art room.
- Use SIDE LIGHTING to create a strong shadow on one side of your face.
- Consider your facial expression, what mood do you want to portray?
photoshop instructions:
part 1: initial steps
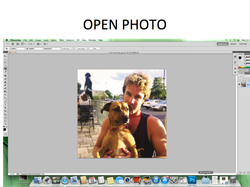
- File > Open
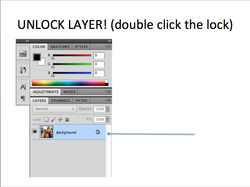
- Double click the padlock to unlock your layer, Click OK.
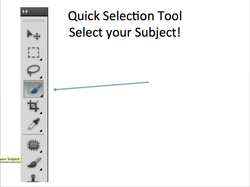
- Select your model using the Quick Selection tool.
- You may also use the quick mask if it helps.
- You may also use the quick mask if it helps.

- When you are happy with your selection, select inverse.
- Keyboard shortcut: Command, shift, i
- Keyboard shortcut: Command, shift, i
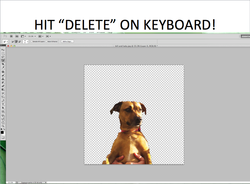
- Hit Delete.
- Your background should now be white and gray checkers.
- Your background should now be white and gray checkers.
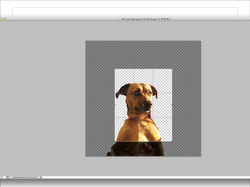
- Get rid of any extra space around your model by cropping your image.
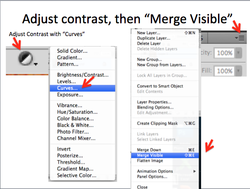
- Add a "curves" and/or "levels" adjustment layer to adjust the lightness/darkness and contrast of you image.
-BE CAREFUL NOT TO BLOW OUT HIGHLIGHTS OR CLIP SHADOWS.
-When you are finished, click on the LAYER MENU icon in the top-right-hand corner of your layers panel and select MERGE VISIBLE...
-BE CAREFUL NOT TO BLOW OUT HIGHLIGHTS OR CLIP SHADOWS.
-When you are finished, click on the LAYER MENU icon in the top-right-hand corner of your layers panel and select MERGE VISIBLE...
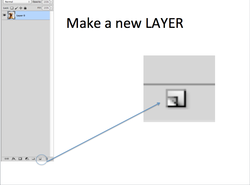
- Create a new BLANK layer by clicking on the "new layer" button at the bottom of your layers panel.
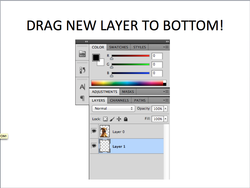
- drag this new layer to the bottom, so that it is underneath your "model layer."
part 2: add color to background
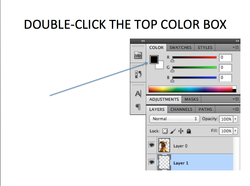
- Make sure your new blank bottom layer is selected (highlighted in blue)
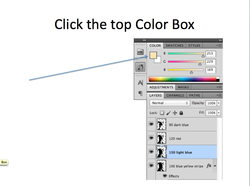
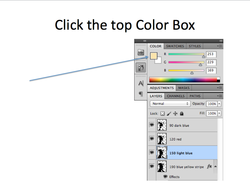
- Click on the top color box (found above layers panel in top-right hand corner of screen)
- Click on the top color box (found above layers panel in top-right hand corner of screen)
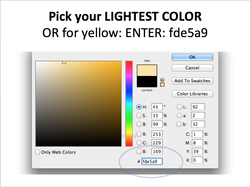
- Choose your color.
- If you are using the same colors as in the Obama Hope poster, type in "fde5a9" in the color # box found at the bottom. This should give you a pale yellow color.
- You can also choose to use your own colors instead. If you are using your own colors, this color will be for the very LIGHTEST parts of your portrait, so choose a very light color.
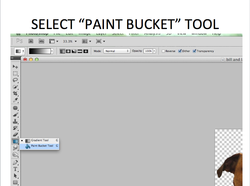
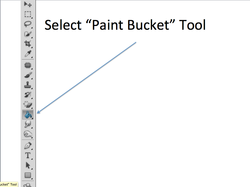
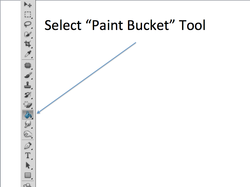
- Select the paint bucket tool.
- (it may be hiding underneath the gradient tool, if so, click and hold the gradient tool button until the menu pops up, then select paint bucket)
- (it may be hiding underneath the gradient tool, if so, click and hold the gradient tool button until the menu pops up, then select paint bucket)
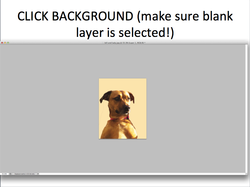
- Click anywhere on your background.
- It should be filled with your selected color.
- It should be filled with your selected color.
part 3: creating threshold layers
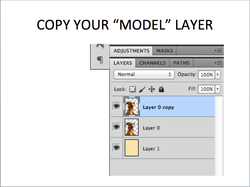
- Make a copy of your top layer, the layer with your model in it (layer 0).
- Do this by first selecting that layer (click on it) and then hitting "command j" on your keyboard.
- Do this by first selecting that layer (click on it) and then hitting "command j" on your keyboard.
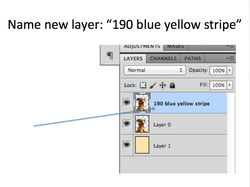
- Click to change the name of that new layer.
- Rename it "190 blue yellow stripe"
NOTE: "Blue yellow stripe" refers to the color this layer will eventually be IF you are using the "Obama Hope Poster" colors. If you are using your own colors, you may choose to leave this part of the name out. But still make sure to rename it with "190"
- Rename it "190 blue yellow stripe"
NOTE: "Blue yellow stripe" refers to the color this layer will eventually be IF you are using the "Obama Hope Poster" colors. If you are using your own colors, you may choose to leave this part of the name out. But still make sure to rename it with "190"
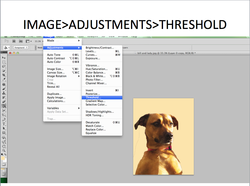
- Go to Image, then Adjustments, then Threshold
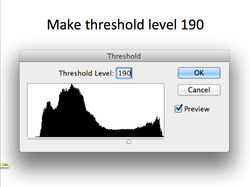
- Change "Threshold Level" to 190.
- Click OK.
- Click OK.
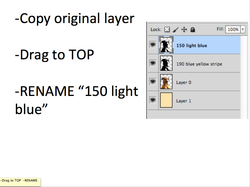
- Make another copy of your original model layer (layer 0)- click on it to select it, then hit command, j
- DRAG THIS NEW LAYER TO THE TOP of your layers panel.
- Rename the layer " 150 light blue "
NOTE: Again, the "light blue" refers to the color this layer will be if using same colors as Obama poster, you may leave this out if using different colors.
- DRAG THIS NEW LAYER TO THE TOP of your layers panel.
- Rename the layer " 150 light blue "
NOTE: Again, the "light blue" refers to the color this layer will be if using same colors as Obama poster, you may leave this out if using different colors.
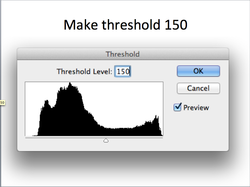
- Adjust the threshold level again by going to Image > Adjustments > Threshold.
- Change the Threshold Level to 150.
- Click OK.
- Change the Threshold Level to 150.
- Click OK.
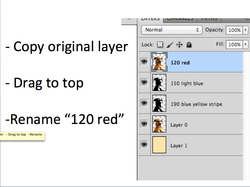
- Make another copy of the original model layer (layer 0). (Click to select it, then command j)
- DRAG THIS NEW LAYER TO THE TOP of your layers panel.
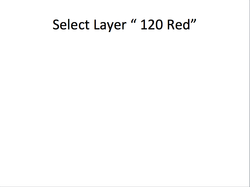
- Rename the layer "120 Red"
NOTE: Red refers to color if using "Obama colors."
- DRAG THIS NEW LAYER TO THE TOP of your layers panel.
- Rename the layer "120 Red"
NOTE: Red refers to color if using "Obama colors."

- Adjust the threshold level again by going to Image > Adjustments > Threshold.
- Change the Threshold Level to 120.
- Click OK.
- Change the Threshold Level to 120.
- Click OK.
- One more time...
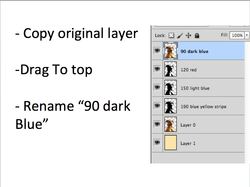
- Make another copy of the original model layer (layer 0). (click to select it, then command j)
- DRAG YOUR NEW LAYER TO THE TOP of your layers panel.
- Rename "90 Dark Blue"
- Make another copy of the original model layer (layer 0). (click to select it, then command j)
- DRAG YOUR NEW LAYER TO THE TOP of your layers panel.
- Rename "90 Dark Blue"
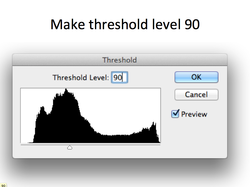
- Adjust the Threshold Level by going to Image > Adjustments > Threshold.
- Change the Threshold Level to 90.
- Click OK.
- Change the Threshold Level to 90.
- Click OK.
part 4- add filter to threshold layers
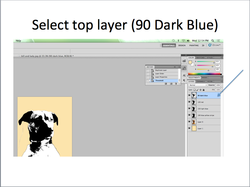
- Select the top layer (90 Dark Blue) by clicking on it.
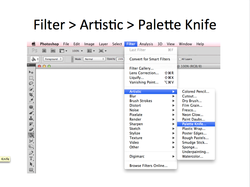
- Go to Filter (at the top) > Artistic > Palette Knife
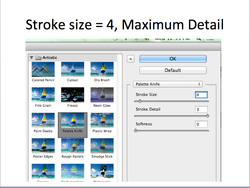
- Make the Stroke size 4.
- Make Stroke Detail the maximum amount.
- Make Stroke Detail the maximum amount.
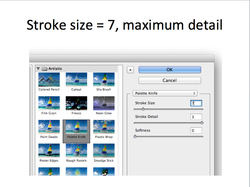
- Now select layer "120 Red"- Go to Filter>Artistic>Palette Knife and make the stroke size 7 and stroke detail the maximum amount.
- Repeat this step for layers "150 light blue" and "190 blue yellow stripe" - making the stroke size 7 and detail the maximum amount for both.
- Repeat this step for layers "150 light blue" and "190 blue yellow stripe" - making the stroke size 7 and detail the maximum amount for both.
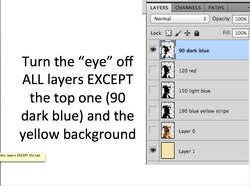
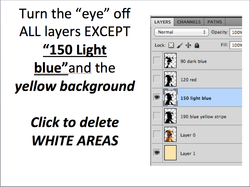
- Turn the visibility (eyeball) OFF ALL LAYERS EXCEPT "90 Dark Blue" and your bottom yellow background layer.
- Click on "90 Dark Blue" layer so that it is selected (highlighted in blue)
- Click on "90 Dark Blue" layer so that it is selected (highlighted in blue)
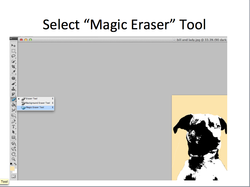
- Select your "Magic Eraser Tool"
- (It is found under your "Normal Eraser Tool." Find your eraser tool, click and hold until the additional tools pop up, then select "Magic Eraser Tool")
- (It is found under your "Normal Eraser Tool." Find your eraser tool, click and hold until the additional tools pop up, then select "Magic Eraser Tool")
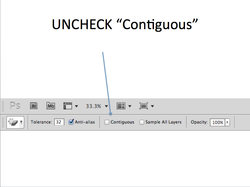
- At the top, in your tools option bar, UNCHECK "contiguous"

- MAKE SURE YOU HAVE "90 DARK BLUE" LAYER SELECTED.
- Click anywhere on the WHITE areas to delete them.
- The yellow background should now be showing through those areas.
- Click anywhere on the WHITE areas to delete them.
- The yellow background should now be showing through those areas.
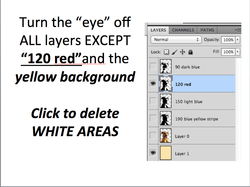
- Now turn your visibility off of "90 dark blue" and turn it ON for "120 red" (visibility is still on yellow background layer as well).
- Click layer "120 red" so that it is selected.
- With magic eraser tool still selected, click on the white areas again to delete them.
- Yellow background should now be showing through those areas.
- Click layer "120 red" so that it is selected.
- With magic eraser tool still selected, click on the white areas again to delete them.
- Yellow background should now be showing through those areas.
- Repeat for layer "150 light blue"
- Turn off visibility from "120 red", turn on visibility for "150 light blue"
- Make sure "150 light blue" layer is selected.
- Click white areas with magic eraser to delete them.
- Turn off visibility from "120 red", turn on visibility for "150 light blue"
- Make sure "150 light blue" layer is selected.
- Click white areas with magic eraser to delete them.
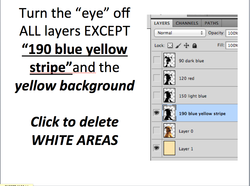
- last time....
- repeat for layer "190 blue yellow stripe"
- turn off visibility from "150 light blue" , turn on visibility for "190 blue yellow stripe"
- Click on "190 blue yellow stripe" to select it.
- Click on white area to delete it.
- repeat for layer "190 blue yellow stripe"
- turn off visibility from "150 light blue" , turn on visibility for "190 blue yellow stripe"
- Click on "190 blue yellow stripe" to select it.
- Click on white area to delete it.
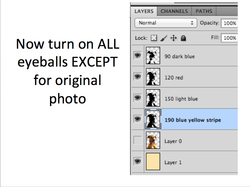
- Now you can turn the visibility back ON for ALL LAYERS EXCEPT LAYER 0.
PART 5- ADDING COLOR TO LAYERS
REMINDER: You may choose to use the same colors as the Obama poster or choose your own.

- Click the link found ABOVE "blue yellow stripe pattern download"
- After clicking the link above, you will be brought to a new page, once there, click "Download"
NOTE: if you are using your own colors, you can SKIP this and the next 6 STEPS. Instead, you will just chose a color to use here. Choose a very light color, just a bit darker than the color you used for your background color. Add the color to your "190" layer by following the directions below for adding color to your "150" layer...
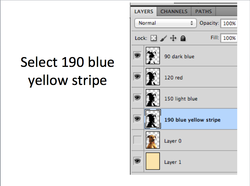
- Click on your "190 blue yellow stripe" layer.
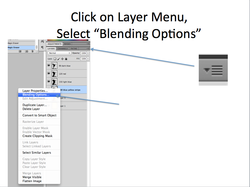
- Click on your layer menu (in the top right corner of your layer panel).
- Select "Blending Options"
- Select "Blending Options"
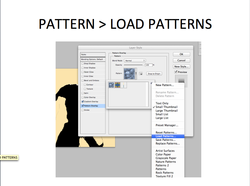
- Click on "PATTERN OVERLAY" found in the menu on the left-hand side of the box (click on the actual word, so that it is highlighted in blue)
- Find the box that says "Pattern" and click it.
- In the top right-hand corner of the new box that pops up, there should be a small circle with an arrow in it... Click here to open up a menu.
- In this menu, select "load patterns..."
- Find the box that says "Pattern" and click it.
- In the top right-hand corner of the new box that pops up, there should be a small circle with an arrow in it... Click here to open up a menu.
- In this menu, select "load patterns..."
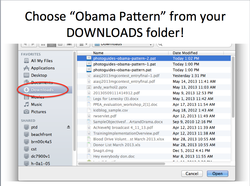
- Find the Obama Pattern you downloaded earlier.
- On left hand side, find your "Downloads" folder, it should be in there.
- Click to select it, then click "Open"
- On left hand side, find your "Downloads" folder, it should be in there.
- Click to select it, then click "Open"
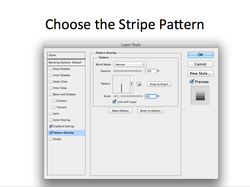
- In the "Pattern" box, make sure your new "blue yellow stripe" pattern in selected.
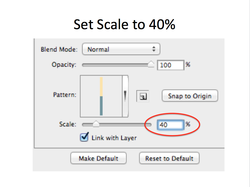
- Underneath the Pattern box, change the scale to 40%
- Then hit OK
- Then hit OK
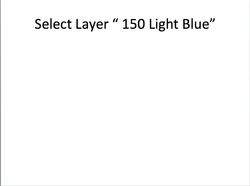
- Now select layer "150 light blue"
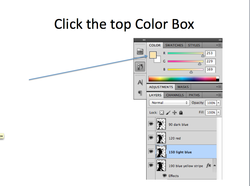
- Click on the top color box, found in the color panel in the top right-hand part of your screen.
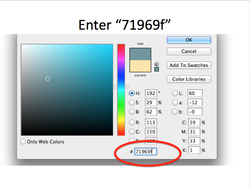
- If you are using the Obama colors, type in "71969f" in the color # box at the bottom, this should give you a light blue color.
-If you are using your own colors, this will be a MIDDLE TONE- not too light, not too dark... choose an appropriate color.
- Hit OK.
-If you are using your own colors, this will be a MIDDLE TONE- not too light, not too dark... choose an appropriate color.
- Hit OK.
- Select your paint bucket tool.
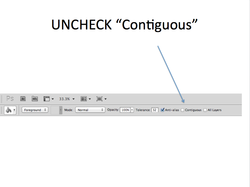
- In your tool options bar at the top, UNCHECK "contiguous"
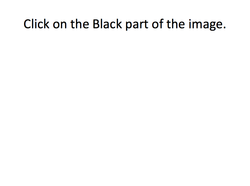
- Making sure that your "150 light blue" layer is selected, click anywhere on the black part of the image to fill that area with your selected color.
- Now select layer "120 red"
- Click your top color box.
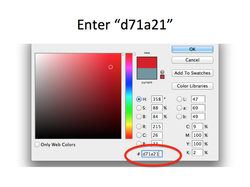
- If you are using the Obama poster colors, type in "d71a21" in the color # box at the bottom.
-If you are using your own colors, this will be a shadow color, so choose a darker color.
-If you are using your own colors, this will be a shadow color, so choose a darker color.
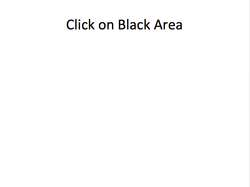
- Click on the black area to fill it with your selected color.
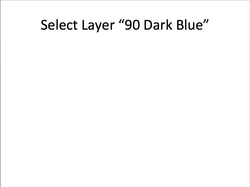
- Now select your "90 Dark Blue" Layer.
- Click the top color box.
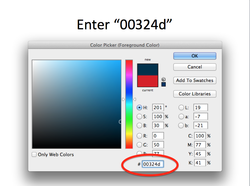
- If you are using the Obama poster colors, type in "00324d" in the color # box at the bottom.
- If you are using your own colors, this will be the DARKEST area of your portrait, choose a very dark color.
- Hit OK.
- If you are using your own colors, this will be the DARKEST area of your portrait, choose a very dark color.
- Hit OK.
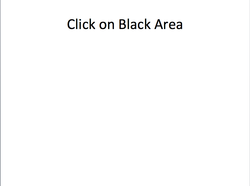
- Click on the black area to fill it with your selected color.
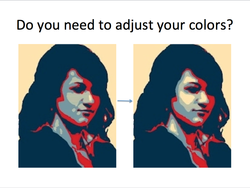
- OPTIONAL: take a look at your portrait... do you like the way the colors look?
- If you would like to bring out more of a certain color (for example- in my example to the left, I wanted to lighten up the girl's cheek, nose, chin, forehead and neck a bit) this is what to do...
- Grab your eraser tool. Select the layer whose color you would like to have less of, erase out your desired areas, this will allow the color underneath it to show through.
- Continue with each layer until you are happy with the result.
part 6: paint your background
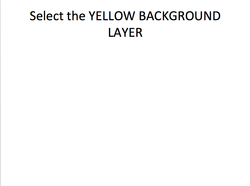
- Click on your bottom-most layer, the yellow background layer.
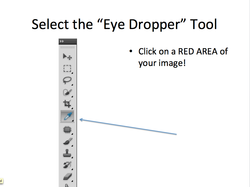
- Select your eye dropper tool (this tool allows you to "pick up" a color from somewhere in your image)
- Click on the RED area of your image ( if you did not use the Obama colors, select the second-darkest color you used).
- Click on the RED area of your image ( if you did not use the Obama colors, select the second-darkest color you used).
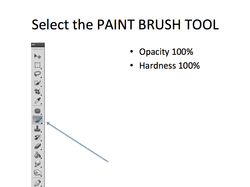
- Now pick up your paint brush tool.
- Set the opacity to 100%
- Make your brush edge 100% hardness.
- Choose whatever size is appropriate.
- Set the opacity to 100%
- Make your brush edge 100% hardness.
- Choose whatever size is appropriate.
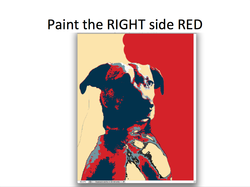
- Paint the entire right hand side of your image.
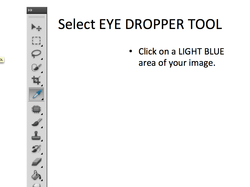
- Now pick up your eye dropper tool again.
- Use it to select your Light Blue Color (if you used your own colors, this would be your middle tone value )
- Use it to select your Light Blue Color (if you used your own colors, this would be your middle tone value )
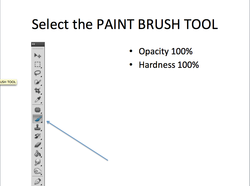
- Now pick up your paint brush again.
- Opacity and Hardness still at 100%
- Opacity and Hardness still at 100%
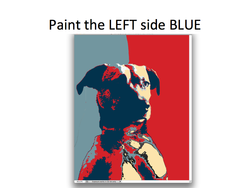
- Now paint the left side of your image.

- Grab your crop tool and crop your photo so that the top of your head touches the top border (so you can't see the seam where your two background colors meet)
- You should crop pretty close around your subject... don't leave much empty space.
- If your crop tool is still set to some specific dimensions that you do not like (it saves your last crop dimensions automatically), just hit the CLEAR button in the tool options bar.
- You should crop pretty close around your subject... don't leave much empty space.
- If your crop tool is still set to some specific dimensions that you do not like (it saves your last crop dimensions automatically), just hit the CLEAR button in the tool options bar.
part 7- add text to bottom
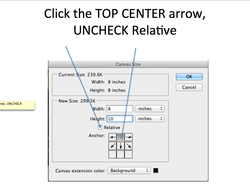
- Go to Image (at the top), then "Canvas Size"
- UNCHECK "Relative"
- Where it says "Anchor" Click the TOP CENTER BOX.
- UNCHECK "Relative"
- Where it says "Anchor" Click the TOP CENTER BOX.
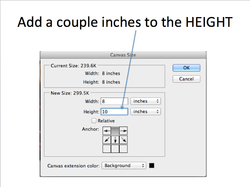
- At the top, notice where it says "Current Size"
- Under new size, enter the SAME width as above in current size.
- Under new size, enter a height that is a few inches larger than the current size.
- Click OK.
- Under new size, enter the SAME width as above in current size.
- Under new size, enter a height that is a few inches larger than the current size.
- Click OK.
- Click on your bottom layer, or background layer, to select it.
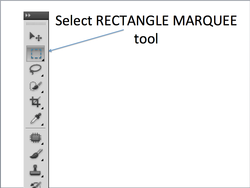
- Select your "Rectangle Marquee Tool." It is the second tool from the top.
- If you do not see the rectangle, click and hold to see the rectangle marquee tool underneath.
- Use the rectangle marquee tool to DRAW OUT A RECTANGLE on the bottom of your canvas (the new section you just added)
- If you do not see the rectangle, click and hold to see the rectangle marquee tool underneath.
- Use the rectangle marquee tool to DRAW OUT A RECTANGLE on the bottom of your canvas (the new section you just added)
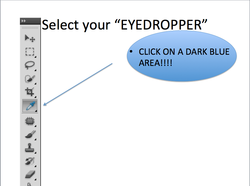
- Now pick up your eyedropper tool.
- Click on a DARK BLUE area of your image to pick up that color (if you used your own color, click on the DARKEST color in your image.)
- Click on a DARK BLUE area of your image to pick up that color (if you used your own color, click on the DARKEST color in your image.)
- Now select your paint bucket tool.
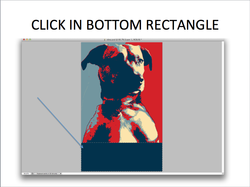
- Click in the bottom rectangle you drew out to fill that area with your dark color.
- If you have any "gaps" use your MOVE TOOL to move the rectangle closer to the rest of your image.
- If you have any "gaps" use your MOVE TOOL to move the rectangle closer to the rest of your image.
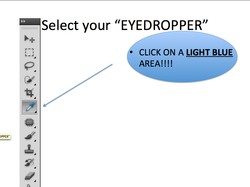
- Now pick up your eyedropper tool again.
- Click on a LIGHT BLUE area of your image to pick up that color ( if you used your own colors, click on the "middle tone" color you used)
- Click on a LIGHT BLUE area of your image to pick up that color ( if you used your own colors, click on the "middle tone" color you used)
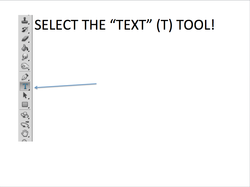
- Now select your "text" tool... it looks like the letter "T"

- To use a font similar to the one in the Obama Hope poster, choose Franklin Gothic Medium from your font drop down box, in the tool options panel.

- Now click on the rectangle at the bottom and type your word.
- Choose a word that describes you or something important to you.
- Choose a word that describes you or something important to you.
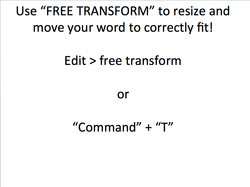
- Now use the "Free Transform" to resize your word so that it fits the entire bottom section.
- You can find your Free Transform tool by going to Edit (at the top) and then "Free Transform"
- Or, use the keyboard shortcut- command, T
- Drag out your word to fill the area.
- You can find your Free Transform tool by going to Edit (at the top) and then "Free Transform"
- Or, use the keyboard shortcut- command, T
- Drag out your word to fill the area.
- If needed, crop your image one last time to get rid of any excess edges you may have.
